Here's the bottle cap charm that I created. I purchased the cupcake images on etsy, punched one out and covered it with an epoxy sticker. I added glass beads and cute metal charms to dangle from the chain. For the packaging, I used my Spellbinders Curvy Rectangles die and cut out a thin piece of chipboard and covered it with a piece of pretty pattern paper.I used thin wire to keep my bottle cap charm in place.
I embossed a small glassine bag, and placed the bottle cap charm inside. Then I added a paper doily and a cute tag I created using Spellbinders dies, Avery Elle's cupcake stamp set and coordinating die, and a wood clothespin.
Next up is the Cupcake card! I used some pretty pattern papers from my stash, tulle and a pretty doily to create layers for my card. The large cupcake was die cut from an older Sizzix die called Cupcake and Cherry. I did some stitching on the cupcake liner, created a seam binding bow and a little tag stamped hello. I think it turned out so cute!
I created a coordinating card box to package the card. The box is made out of white card stock and then covered with pattern paper. I made a cute paper rosette and topped it off with a bottle cap and sweet cupcake image. The rosette is adhered to a white satin ribbon belly band.
And here's the altered journal. I found the journal at my local craft store, covered it with layers of card stock and pattern papers. Then I added a bit of lace and another paper doily. I found the vintage cupcake image online and thought it went perfectly with the papers.
The pretty roses are from my stash and are covered with Diamond Dust for that "sugared" look. Then I added the Spellbinders die cut leaves to my flower clusters for a fuller look. I added a laser cut word at the bottom to complete the sweets theme.
I kept the packaging simple by wrapping the journal in tissue paper and ribbon. Then I topped it off with a burlap rose and vintage tag.
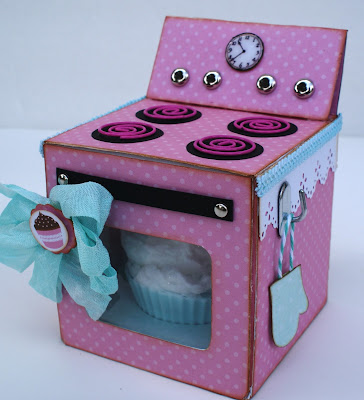
For my homemade goody of choice, I chose to make a cupcake shaped soap. It was my first time making soap and it was actually a lot of fun! I forgot to take pictures of the cupcake soap but you can see a little bit of it here, inside the oven box I packaged it in.
I found the oven box template here.(Thank you so much Marzi for the tutorial and template). I covered the box panels with paper as I was putting it together. Then I inked all my edges lightly with Vintage Photo Distress ink. I used metal brads for the "knobs", printed a tiny clock face and adhered it to the top. The burners are small circular paper clips I picked up at my local craft store.I also made a little oven mitt and hung it from a hook on the side of the oven box.
I added a strip of decorative card stock and braided trim on the sides of the oven box to pretty it up some more.Then I created a seam binding bow and topped it off with a tiny cupcake cut out.
I had a lot of fun creating all these projects and I sure hope my swap partner likes them!
Thanks so much for stopping by today!
I'll be seeing you real soon.


