Showing posts with label vintage. Show all posts

Tuesday, June 2, 2015

Vintage Tea Themed Paper Bag Card

Welcome back to my blog! Today, I just have a quick card share I created for a challenge on Youtube. The challenge was hosted by Not2Shabby shop and required us to create a paper bag card. Having never made one before, I thought I'd participate and give it a go. Not only was so easy to make, but the card turned out great! Let me know what you think.


I went for a vintage, tea theme for my card with browns and pinks. I just love this paper collection by DCWV, appropriately called "Garden Tea Party". The paper bag I used is just a standard lunch bag size. I folded it in half and then adhered my papers. The closure for my bag is a bit of lace ribbon I had in my stash.

 
I created all the flowers from coordinating cardstock using Spellbinders Bitty Blossoms Dies. Then I dabbed them with white acrylic paint to make them more shabby. The leaves were fussy cut from the paper collection and I added pips to my flower clusters.


For the focal point of my card, I used a stamp set by Graphic 45 called Tea party. I stamped the images onto a piece of pattern paper and then fussy cut them out. I then,  adhered them to the Spellbinders circles with foam tape for dimension. The cute sentiment is from a Fiskars stamp set called Latte Love.


The inside is also decorated with the pattern paper. I created a pocket on the left hand side that's perfect for adding a gift card. The stacked tea cups and flowers were also fussy cut from the collection and adhered to the bottom right hand side. This still leaves plenty of room for me to write my message to the recipient.


 This is the back of the card, also covered with the beautiful papers.

That's it! I love the way it turned out. The paper collection and the stamps were just perfect for what I had in mind. Hope you like it too!

Thanks for stopping by. Have a wonderful day!

Thursday, May 14, 2015

Tags of 2015, May

Hi everyone! Today I want to share my take on Tim Holtz's May tag. Unfortunately, I didn't get a chance to play along in April but I made it a point to make time for this month's tag.  Especially when I saw how gorgeous it was! Tim really did an amazing job with this one. I loved everything about it from the burlap, to the vintage photo, to the handmade blooms. It was just stunning!

 May 2015 Tag

I worked on my tag the day before Mother's Day and as I was going through the Photo Booth  photos, I came across one that reminded me so much of my mother, when she was young. I just knew that was the one I was going to use and I decided to play tribute to my mom's love of sewing on my tag.I followed Tim's steps exactly but just improvised with products I had on hand.


Here's a closeup of the photo I used. I tinted it with Worn Lipstick, Tumbled Glass and Wild Honey Distress Markers.The ephemera pieces I selected worked really well with the sewing theme I was going for and I even added a little scissors charm to the top of my tag.


I love the way the flowers turned out, so pretty and vintage. I didn't have Tim's Mini Tattered Florals dies so I had to improvise with Spellbinders Bitty Blossoms dies. I die cut them out of Coredinations card stock and dabbed them with Walnut Stain Ink to give them that vintage look.


The pretty pink bow is made out of crinkled seam binding colored with Worn Lipstick Distress Stain. I just love how vibrant that pink looks. Then I just added the little Small Talk stickers and done!

I'm so in love with the way it turned out!!! Every time I look at it, it reminds me of my mom, and that just makes my heart happy!

There's still plenty of time left for you to play along. It really was so much fun working on this tag. Bring on the next one!

Thanks for stopping by today. I hope your day is a blessed one.


Friday, May 8, 2015

Mother's Day Coupon File Folder Folio

Good morning crafty friends. With Mother's Day only  a few days away, I thought I'd share with you a sweet gift idea for the special woman in your life. I was inspired by a grocery store run and a childhood memory. Weird, I know.When I was about 9 years old, I remember making a coupon book for my mom, for Mother's Day. Do you guys remember those? Each coupon was good for a small chore or kind gesture for your mom, to show your appreciation.Well, I was remembering all this while pulling out my coupon folio at the grocery store.You know, the kind that has pockets inside to sort your coupons? I combined the two ideas together and created my grown up version of that childhood coupon book to gift my mom this Mother's Day.


Here it is! Isn't it pretty? I thought Graphic 45's Precious Memories collection would be perfect for my project. I love the sweet mother and baby images and it has lots of blues, which is my mom's favorite color. The folio is constructed of card stock and I found the tutorial here. It measures 7x9 inches and has 6 pockets inside.


Here's a view of the cover. I did a lot of fussy cutting to create a collage, if you will. You can see bits of lace peeking out in the back and I used one of the post cards from the ephemera pack.I also used one of the chipboard pieces from the collection and accented it with tiny pearls and a sweet little bow.


I created 5 large, tag shaped coupons.Each has a sweet sentiment stamped onto one of the smaller journaling cards. Then I added fussy cut flowers and used the sticker sheet to spell out "coupon" at the bottom of each tag.


I printed out the coupons ,cut them out and adhered them to the back of each tag. So all my mom has to do is select a coupon and hand it over to redeem it. Easy, and this guarantees me some quality time with mom! We can take pictures during our times together and she can keep these pictures inside her folio. Precious memories! 

I do hope you like my Mother's Day gift idea and to all the mothers out there, I wish you a wonderful Mothers' Day!!!

Thanks for stopping by today. I'll be seeing you all real soon!

Thursday, May 7, 2015

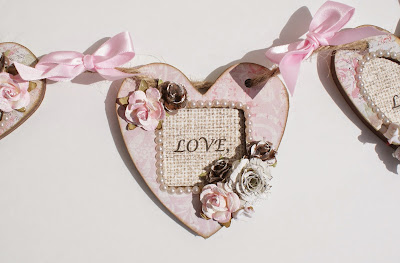
Shabby Chic Wood Heart Banner

Hi guys! This month I've been asked to be a guest designer for my sweet friend Sa's shop. Sacrafters carries tons of OOAK wood and chipboard products to alter, as well as embellishments and stencils.And her prices can't be beat! You can use my discount code "LIZFANS" for an additional 10% off your purchase of $30 or more and it's good for the entire month of May.
Let me share with you my first DT project for the month.


I altered her Wood Heart Mini Album and turned it into a banner for my wall. I've been stressing out a lot lately and I just wanted a little reminder to appreciate the little things in life, and not worry about things I can't control. Of course, I had to make it shabby chic to go with my decor and I think it turned out quite sweet.


You get 10  raw wood pieces, 5 solid pieces and 5 cutout pieces to lay over the base. I didn't paint mine but simply covered them with designer paper and inked the edges with Frayed Burlap Distress Ink. I printed out the words onto pattern paper and then adhered each word to the heart base, making sure I centered it with the opening of the heart shape.


The small flowers are all from my stash and I dabbed white acrylic paint to the tops. I created the music sheet flowers with my Spellbinders Bitty Blossoms Die and then sprinkled the flowers with Glamour Dust.


I really like how each piece has a different "window" shape, so I accented each opening with mini flat back pearls. The pearls add such a pretty little detail.


Lastly I threaded a piece of jute through each of the holes and tied pretty pink bows in between each wooden heart piece.

My heart banner looks so pretty on my wall and best of all it reminds me to "Live, Love, Laugh every day". And at the end of the day that is all that really matters!

I hope you like my project. Head on over to Sacrafters shop and check out all her alterable products and don't forget to use my discount code "LIZFANS" to save even more.

Thank you so much for stopping by today! I'll see you all real soon.

Wednesday, May 6, 2015

Gorgeous Junque Gypsy Memory Folio

Happy hump day everybody! Man, this week has just flown by, can't believe it's Wednesday already. Today I want to share a recent project for Craft Source using Marion Smith's Junque Gypsy collection. I was inspired to create a memory folio by a very talented lady on Youtube named Kona Raven. I follow her channel and was so impressed by the gorgeous folios she creates, that I just had to give it a try. She was even so generous to provide an awesome tutorial that I will share at the bottom of this post.

Junque Gypsy Memory Folio

Isn't it gorgeous? The entire thing is constructed of black card stock and tons of Scor Tape. The paper on the cover was my favorite sheet from the collection.I just loved the colors and the beautiful roses.All the edges are inked with Walnut Stain Distress Ink and I added 2 fussy cut butterflies from the collection to the cover, as well as a metal frame from Prima. The closure is crinkled seam binding colored with Prima's Color Bloom Spray in Cotton Candy.


This is what it looks like on the inside when you first open it up.There are lots of pockets for tags and 2 mini books being held by a belly band on the right hand side.


 It opens up to reveal even more pockets and photo mats and a really cool water fall feature.


More photo mats and space for journaling.

I really love the way this folio turned out and I encourage you to check out my video to really see all the details. I didn't want to make this post so photo heavy so I only focused on certain parts of the folio.To truly appreciate it, you have to see the whole thing. You can check out my video here.

Thank you Kona Raven for the inspiration and the wonderful tutorial. You can check out Kona's 2 part tutorial here.

Thanks for stopping by today! I hope you all enjoy the rest of your week! Happy crafting.

Thursday, January 29, 2015

Berry Basket Gift Baskets and Sweet Goodies for Valentine's Day

Hi everyone! I'm back today with another  Valentine's Day project. I met up with a couple of sweet friends last Friday and I wanted to make them a little something, something. We don't get to see each other very often because we live so far apart from one another. So it's always nice to get together and catch up and share a few laughs. Being that Valentine's Day is right around the corner, I thought some sweet V-Day projects were in order.


I had picked up a pack of berry baskets from my local craft store during Christmas time (marked down 80%). Score! The color was perfect for V-day so I just added some crinkle tissue and filled them with little crafty goodies to create these sweet gift baskets. Quick and easy little gift.


And who doesn't love something sweet for Valentine's day? I filled these glassine bags with chocolate hearts, wrapped bakers twine around them and added a cute circular tag and clothespin.


You can't give a gift without a card so I created 2 different cards for each of my friends. I made one vintage and the other shabby chic.


The sweet vintage die cuts are by K and Company. I picked them up a few years back and I still love them. I sprinkled the roses with Diamond Dust and then dabbed white acrylic paint on top for a shabbier look.

My friends loved their gifts and I loved spending time with them.Can't wait for our next meet up. 
Thank you so much for stopping by!

Sunday, December 14, 2014

Graphic 45 Twelve Days of Christmas Advent Calendar

I'm back with my second post of the day! As you can tell, I'm a little behind on my posts so I want to catch up before the holidays are over!
This project is for my baby girl, who loves counting down the days until Christmas.

 Twelve Days of Christmas Advent Calendar

I picked up a paper mache advent calendar at HL and started off by painting the edges and compartments with Warm White acrylic paint. I then covered the advent calendar with papers from Graphic 45's Twelve Days of Christmas collection ( one of my faves). Each compartment is numbered and decorated with fussy cut images from the 8 x 8 paper pad. The numbers were stamped in Versamark and then heat embossed with gold powder.This really makes the numbers pop.


I sponged gold acrylic paint and Snow-Tex on all the edges to give them a snowy look.


 I fell in love with the signature page of this collection but it was too big to fit on the back. So I decided to "re-create" it , my way .  All the images were fussy cut from  the paper then layered over and  under the song lyrics.  I used foam tape on some of the images to give them more dimension.


I created a cute Christmas morning scene on top of the calendar. The little tree is from the dollar store. I dabbed it with white gesso, added gold bead trim, red bows and topped it off with a glittered star. All the tiny gift boxes and bags were made by hand using scraps from the paper collection. I found the little wagon and teddy bear in the miniature section of my local art store. They are the perfect addition to my Christmas scene.

Needless to say, my daughter loved it and looks forward to opening the little compartments each morning. There is always a sweet surprise awaiting her. 
Thank you so much for stopping by!

Christmas Stocking and Mitten Gift Card Holders

Hi everyone! So Christmas is 2 weeks away and I haven't even started my shopping! Please tell me I'm not the only one ( I know there are others like me out there, hehe). No but seriously, I really need to get a move on. Sometimes, I just don't know what to get someone so I usually stock up on gift cards. Yeah, yeah,  I know that's a little impersonal but I'd rather buy a gift card than purchase something that will end up in a bin somewhere, or in the trash. I personally don't mind receiving a gift card, this ensures I get something I really want. And who wouldn't like that!
Anywho, I wanted to create some cute gift card holders for all my gift cards. I came across these super cute stocking holders on Pinterest and was instantly inspired. So let me show you what I made...

Stocking Gift Card Holders
 
 Aren't they cute? The ones I saw on Pinterest were created with a die, but I thought I could make my own by just using  a template. I found a stocking template online and printed it to size. I then cut it out and traced it onto heavy weight cardstock. This ensures I have a template I can use over and over again. 
The paper collection is "Christmas Home" by Teresa Collins. I also used bits of lace and braided trim to decorate my stockings. Those cute poinsettias are from HL and the leaves were fussy cut from the paper collection. I added a bit of tinsel to the tops to make them more festive.
I loved the stockings so much that I decided to make mitten gift card holders too. I made these a little more vintage looking and a lot more dimensional.


Omg, I adore the way these turned out! I found the sweet images online and printed them on ivory cardstock. Then I distressed them with Vintage Photo for the perfect aged look. I used Authentique's "Festive" collection for these.  The clear snowflakes  and the festive red ribbon are from the dollar store. The greenery is from a Christmas pick and the Pinecone bunch was purchased at HL.  Who wouldn't want  to receive a gift card in one of these. They can also double as cards if you just add a message on the back. Super cute!
 
I hope you like my projects! And hopefully I've inspired you to make your own sweet gift card holder.
Until next time, take care!!!


Tuesday, July 8, 2014

Bo Bunny Country Garden Altered Frame and Birthday Card

Hello there! I'm back to share some more projects with you all!
Last week, my sweet, wonderful mom celebrated her 64th birthday. She is a huge fan of anything from " I Love Lucy" and collects the Lucy Barbie dolls, so my husband and I ordered some dolls online. Unfortunately, they would be arriving a few days after her birthday. I didn't want her to not have anything to open on the big day, so I decided to alter a frame for her. She loves to display pictures of her kids and grandchildren all over her room and she just loves when I make her stuff. She loved it! And immediately found a picture to put in it.


I started off with one of those $1 frames from Michael's and painted the sides a warm white. Then I covered the frame with Bo Bunny's Country Garden papers. I distressed the top piece by tearing random pieces and inking the edges with Walnut Stain Distress Ink. I also used my Martha Stewart punch to punch out border strips that I tucked in between papers.


The wooden dressform is from Sacrafter's shop and I left it natural. I just made  a "dress" from one of the pattern papers and added a piece of strung pearls for a necklace. And just look at those flowers! Aren't they gorgeous? The big blue one was gifted to me by Sa and the pink ones are from my stash. They were originally white but I colored them with Heidi Swapp's shine spray in Blush. 


I added Diamond Dust to the tops of all the flowers and tucked pieces of white tulle in my flower cluster, for added girliness! ( Is that even a word?) I also cut apart an Easter pick and used the berries to accent the arrangement. The leaves were die cut with one of the Spellbinder's Foliage dies and pattern paper.


Love these little wooden sentiments from Michael's. They come white and are so shabby chic. Perfect for my frame!


I also made a coordinating card to go with the frame. This was my first time using the Spellbinders Resplendent Rectangles dies, I've had forever.They are sooo pretty! Then I just added a Kaisercraft wood frame and some pearls for accent. The banner was fussy cut from one of the pattern papers and then stamped with "Happy Birthday".


Here's the two pieces together. I think they turned out so pretty and shabby! My mom loved them both and I loved watching her smile when she opened them. Let me know what you think. I really appreciate your sweet comments.

Have a wonderful day!
Monday, May 12, 2014

Altered Jar, card in a box, and handmade gift box for Mother's Day

Hi everyone! I hope you all had a wonderful Mother's Day, yesterday. Mine was pretty uneventful ( not that there's anything wrong with that). We're just not big on going out for Mother's Day. I mean, all the restaurants are booked solid, you've got to deal with all the crowds, and really it's just another day in my book. Now, that doesn't mean we don't do gifts. No sir, I better get something good for all the hard work I do all year, lol! And hubby, never disappoints. This year instead of buying me a bouquet of flowers that will only die in a few days, he went out and bought me a garden! Really! He came home from Lowes with tons of beautiful blooms, rose bushes, Casa Blanca Lilies  and spent the entire afternoon planting them all in the yard. Now I can enjoy beautiful flowers all year long! Love that man of mine, hehe.
As for me, I spent the day finishing off the projects  I made for my mom. I am so very fortunate to still have her in my life and she means the world to me. So every year, I try to make something special for her, to show her how much I care. One of the first things I ever made her was a macaroni "portrait" when I was 5 years old. The smile was all lopsided and it definitely didn't look like her, but would you believe she still has it? Well, my crafting abilities have definitely improved since then, so let me share what I made.

Altered Mason Jar

 
My mom really loves to sew but she is always losing her sewing notions. So I came up with a  solution to that problem. I decided to alter a good ol' fashioned mason jar. The lid became a pincushion for her pins and needles and she can open the jar and use it to store her thimbles, tape measure etc... Plus it makes for a cute décor piece, don't you think?


Sewing Theme Card-in-a-box
 
I've been seeing so many of these pop up cards on Pinterest and I just had to give it a try. They look complicated but they are really so easy to make. Of course, I continued with the sewing theme and I used several of my Tim Holtz dies to decorate my card. I used the Ornate Frame die and turned it into a mirror using the adhesive mirrored sheets. I also used the Sewing Room die and part of the Sewing Edge die to create some embellishments. The paper collection I used is by DCWV call the Primrose Stack. It's gorgeous!!


Handmade Gift Box
 
Well, you can't give such a pretty card in just a plain old envelope, right? So I created a cute little gift box for my card.
 
 
See how nicely the card fits in the box and it makes for such a beautiful presentation.
 
 
 Here's a picture of the whole gift set.
 
I'm so happy with the way my projects turned out and my mother loved them! The smile on her face was as big as the one many, many years ago , when I handed her the macaroni portrait. That smile always bring me great joy! Love you to pieces Momma!
 
Hope you all enjoyed my projects and please come back to visit . I'll see you all real soon.