Showing posts with label flowers. Show all posts

Friday, July 31, 2015

"Rustic Harmony" Altered Cupboard

Hey crafty friends! Man, it's been a busy summer!!! I'm sure you all can relate, right? With the kids being home from school and trying to find ways to entertain them,(so they don't kill each other,lol), it's hard to find time to craft.Plus I still have to clean house, run errands and you know, do everything else.Geez the  never ending workload of a stay at home mom!!!  But... I did manage to make some time to create 2 more projects for Sacrafters shop, this month. I will share one today and the other on the next post. Today's project is a storage unit for my craft table. I needed something to store some of my smaller laces and trims, and Sacrafter's Cupboard w/ shadowbox was just perfect for the task.


Like all of Sacrafter's products, this was so easy to put together. I painted all the surfaces that were not going to be covered with paper, with a light gray acrylic paint I mixed myself.Then I adhered all my papers, buffed the edges and inked them with Tim Holtz's Pumice Stone Distress Ink. The papers I used are from Kaisercraft's Rustic Harmony collection and are just dreamy!


I didn't want to over embellish the top of the cupboard so I just added a wooden frame, a few of the coordinating die cuts, flowers and bits of lace. I threw in a few pearls here and there for good measure.


I spattered paint on the entire piece just to give it a more rustic feel. I really love the wood grain paper I used on the sides. Really looks great!


Here you can see the spools I used to hold the wooden frame up, on top. I painted them with the same light gray paint mixture and wrapped coordinating ribbon and lace around them.


The shadowbox area is perfect to store these simple lace cards. It fits quite a bit of them in there.


 The door pulls are Kaisercraft's wood flourishes with a G45 metal brad in the middle. I took the prongs off the brads, painted them with gunmetal paint and then dabbed light gray acrylic paint t the tops. Perfect little door pulls!


Behind the doors is storage space for more lace cards or spools. 


Here's the back of the unit covered with the pretty papers and splattered with bits of paint.

What a great piece! It was so much fun to alter and it looks so pretty sitting on my table. When I need to reach for some of my favorite smaller, laces all I have to do is reach across the table and there they are.
I sure hope you head on over to Sacrafters and check out her shop. If you love to create unique, off the page projects, this is your one stop shop! Don't forget you can use discount code "LIZFANS" to save 10% off your purchase of $30 or more. 
Thank you so much for stopping by today. Hope you'll come back and visit real soon!
Have a great day.

Sunday, July 12, 2015

Tilda Altered Tray Embellishment Center w/ 3D Tea Cups

Happy Sunday everyone! Today, I'm coming at you with my first GDT project for Sacrafters shop, for the month of July.  Sa sent me so many awesome goodies to alter and I always get so excited when I'm asked to guest design for her shop.One of the first things I noticed, in my DT package, was a cute little serving tray. Having recently picked up Tim Holtz Tea Time die, I thought of a great way to incorporate the two into a cute embellishment center. Check it out!


This is the largest of the serving trays available in Sa's shop and was so easy to put together. I painted all the exposed parts with Bleached Sand acrylic paint by Americana and then I covered it with papers from Tilda's Tiny Treasures paper pad. I just adore this paper pad for all it's sweet images and gorgeous papers! 


All the edges were distressed with a sanding block to give it an aged look. Then I adhered a pretty floral trim all around the tray and flat back pearl trim on top of that.


I created small flower clusters on each handle side with die cuts from the paper pad and flowers from my stash.


I'm so in love with the gorgeous prints of this paper collection.
So shabby chic!


The sweet tea cups were created with Tim Holtz Tea Time die. I die cut the tea cups and saucers from the paper collection and made them 3D. If you're interested to see how I did that, go check out my mini tutorial, here.


I added a flower die cut piece to the front of each tea cup. Then I made the cute little tags and glued them to the inside of the tea cup. I filled each tea cup with shredded tissue and tiny fabric flowers. And now I have a really cute embellishment center for my craft table! I can switch out the embellishments to suit the project I'm working on and the tray serves as a pretty decor piece.

I hope you like my project and I encourage you all to check out Sacrafters shop. Her off the page products are so unique and so much fun to alter. You can use my discount code "LIZFANS" for 10% off your purchase of  $30 or more.

Thank you so much for stopping by today! Hope to see you all real soon!
Have a great day.

Thursday, June 25, 2015

"Oh So Lovely" Altered Photo Display Tray

Welcome back crafty friends. It's been a few weeks since I posted anything on my blog, but I got a good reason, I promise. You see, I uh...lost my mojo. I know, I know, that's crazy right? I tried and tried to sit down and create something pretty, but my mind was just  blank. Nothing was coming to me and I was just dying to create!After several days of ,well, nothing, I decided to take a break and just ride this one out. I've been stressing out a lot lately and I think that had a lot to do with me not being able to create. I knew my mojo wasn't gone forever ( or so I hoped). I think I just needed a little  "me" time with no DT projects and commitments. Sure enough, a few days ago, I was finally able to sit down and like magic, all my creative juices started flowing again! Yippee, my mojo was back! I've never been happier to get my hands all inky and create a mess in my craft space,lol. Today I'm sharing the fruits of my labor, a true labor of love.


You have no idea how happy it made me to finally craft! I had recently purchased Kaisercraft's "Oh so Lovely" paper pack and I was inspired by the beautiful mother/daughter sentiments throughout the collection. So, I decided to alter a photo tray, I had picked up at my local  craft store, and create a tribute to the special bond I have with my girls.


I wanted the tray to be bright, fun and feminine. The girls and I took silly selfies that I changed to black and white to coordinate better with the paper collection. I added bits of lace and sweet feminine touches throughout the tray.


I love the look of bare wood embellishments,that's why I left the word "Smile" as it was. The frame was die cut from chipboard and pattern paper and then I cut it in half.The sentiment in the center is from the coordinating Collectables pack by Kaisercraft.


 This is the sentiment that inspired the entire tray. I popped it onto another die cut piece and layered it over a paper doily. The birdcage was fussy cut from the collection and I also added two glass vials on the lower right hand corner. The vials are filled with tiny beads from my stash.


 Here's a silly picture of my oldest daughter and I . She has a habit of taking pictures with half her face gone,lol. I added a cute resin bicycle and lots of handmade flowers. The words are stickers that I cut up and popped up with foam tape.


I created a cute little banner to spell out "Love" and adhered it to the top of the compartment. Here's another silly picture of my little girl and I.A bit of lace and pearls round out this compartment.


For this compartment, I created a little "art journal" using Spellbinders Labels 7 dies. I created a little book and used a script stamp to stamp on the pages. I cut out the individual words from a sticker phrase.


All of the gorgeous flowers were handmade out of coffee filters. You can check out my coffee filter flower tutorial here.

Thank you so much for stopping by today! Hope to see you all real soon.

Tuesday, June 2, 2015

Vintage Tea Themed Paper Bag Card

Welcome back to my blog! Today, I just have a quick card share I created for a challenge on Youtube. The challenge was hosted by Not2Shabby shop and required us to create a paper bag card. Having never made one before, I thought I'd participate and give it a go. Not only was so easy to make, but the card turned out great! Let me know what you think.


I went for a vintage, tea theme for my card with browns and pinks. I just love this paper collection by DCWV, appropriately called "Garden Tea Party". The paper bag I used is just a standard lunch bag size. I folded it in half and then adhered my papers. The closure for my bag is a bit of lace ribbon I had in my stash.

 
I created all the flowers from coordinating cardstock using Spellbinders Bitty Blossoms Dies. Then I dabbed them with white acrylic paint to make them more shabby. The leaves were fussy cut from the paper collection and I added pips to my flower clusters.


For the focal point of my card, I used a stamp set by Graphic 45 called Tea party. I stamped the images onto a piece of pattern paper and then fussy cut them out. I then,  adhered them to the Spellbinders circles with foam tape for dimension. The cute sentiment is from a Fiskars stamp set called Latte Love.


The inside is also decorated with the pattern paper. I created a pocket on the left hand side that's perfect for adding a gift card. The stacked tea cups and flowers were also fussy cut from the collection and adhered to the bottom right hand side. This still leaves plenty of room for me to write my message to the recipient.


 This is the back of the card, also covered with the beautiful papers.

That's it! I love the way it turned out. The paper collection and the stamps were just perfect for what I had in mind. Hope you like it too!

Thanks for stopping by. Have a wonderful day!

Sunday, May 24, 2015

"Adorable" Gorjuss Girl Altered Photo Display

Happy Sunday everyone! I'm here again, to share another Guest Design Team project for Sacrafters shop. Today's project is a fun 3D scene I created with one of Sacrafters Photo Display units and an adorable Gorjuss Girl stamp. She carries several different styles of these fun, wood Photo Displays in her shop, as well as other awesome off the page products. You can check out Sacrafters store here and if you make a purchase of $30 or more, you can save an additional 10% off your purchase with my discount code "LIZFANS".


So here it is! Isn't it adorable? 
The unit was so easy to put together. First,I used a warm white acrylic paint to paint the parts that weren't going to be covered with paper. Then I used Prima's Princess 6x6 paper pad to cover the rest of the unit. All the edges were buffed with a sanding block then inked with Vintage Photo Distress Ink.


The Gorjuss stamp is called "Hang me up to dry". I colored the sweet image with my Copic markers and paper pieced the dress and cute little socks. I used foam tape to adhere the stamped image onto the hanging piece and then added those cute little cloud die cuts. Both the cloud die and the grass and flowers die are from the Magnolia Doohickey Club Volume 4.


Here, you can see the green ribbon I used to wrap around the unit. I love how it looks like vines. I then added those tiny, pink roses from my stash.


I used two Martha Stewart butterfly stamps to stamp onto scraps of paper using archival ink. Then I fussy cut them out, added pearls to the centers and adhered them randomly to the unit.


I knew it would be very difficult to cover the title with the pattern paper so I used paint instead. First I painted the letters with a warm white acrylic paint.Then I took a a script stamp inked with brown archival ink and randomly stamped onto the letters.Next,  I used a sponge dauber and dabbed pink, peach and white acrylic paint on top. Lastly I inked the letters with Vintage Photo Distress Ink. I really love the way the title turned out because it matches the papers so well.


The back of the unit is also covered with paper and here, you can see that cute picket fence I adhered to the posts. 

I really do love the way this project turned out. It was so fun and easy and just looks adorable in my daughter's room.
If you like this project, head on over to Sacrafters shop and check out the rest of her amazing off- the-page products. They are all constructed of high quality materials and so fun to alter. 

Thank you so much for stopping by today! I hope everyone has a wonderful Memorial Day.
See you all real soon!

Thursday, May 21, 2015

"Little Miss" Altered Shadowbox Stand

Hello crafty friends! Welcome to another project share for Sacrafter's shop. Like I've mentioned in my previous post, I'll be guest designing for her shop for the entire month of May. If you are not familiar with Sa's store, I highly recommend you check it out, here. You will find wonderful wood pieces to alter as well as amazing,one of a kind, wood and chipboard die cuts for all your crafty projects. I also have a a special discount code you can use to save 10% off your purchase of $30 or more.Simply type "LIZFANS" in the coupon box and, instant savings!
So today's project share is an altered shadowbox I created for my oldest daughter.It's just a little reminder for her to remember to always "shine"!


This is Sacrafter's Square Shadowbox Stand. It is made out of MDF wood and is so easy to put together. I covered the wood pieces with Bo Bunny's Little Miss collection. I only had a few pieces left of this collection and I put every scrap to good use.


I adorned the shadowbox with different fussy cut elements from the paper collection. Then I draped some pearls for an elegant look. Lastly I added flowers in coordinating colors and a beautiful Magnolia Doohickey butterfly to the corner of the box.


There's a picture of my lovely daughter inside this cute, resin frame. I just look at her picture and can't believe how much she's grown! She's turning into such a beautiful young lady, inside and out.The background paper had a really great quote that I thought fit perfectly with the project. It reads "Don't be so hard on yourself, choose to shine." She's had problems with low self esteem in the past and I've always told her it's a matter of choice. It's our choice to "shine" and be happy or to choose to be down in the dumps.Embrace who you are and be the best at being you! I think she's actually listened,lol!


This is the base of the shadowbox stand. I created a little cluster of  flowers, pearls and a fussy cut birdcage at the bottom.


 Side views of Shadowbox Stand.

 Back view of Shadowbox Stand.

My daughter loved the final outcome and called it her "little shrine". I'm just happy to have put a smile on her pretty little face.

If you would like to get your hands on this shadowbox or other similar products, head on over to Sacrafter's for a huge selection of off-the-page products. Don't forget to use my discount code for even more savings.

Thank you so much for stopping by today. I hope you like my project and I'd really love to know what you think.
Have a wonderful day and I'll see you all real soon!

Thursday, May 7, 2015

Shabby Chic Wood Heart Banner

Hi guys! This month I've been asked to be a guest designer for my sweet friend Sa's shop. Sacrafters carries tons of OOAK wood and chipboard products to alter, as well as embellishments and stencils.And her prices can't be beat! You can use my discount code "LIZFANS" for an additional 10% off your purchase of $30 or more and it's good for the entire month of May.
Let me share with you my first DT project for the month.


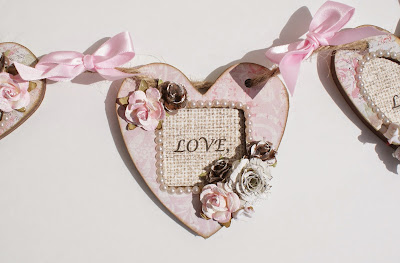
I altered her Wood Heart Mini Album and turned it into a banner for my wall. I've been stressing out a lot lately and I just wanted a little reminder to appreciate the little things in life, and not worry about things I can't control. Of course, I had to make it shabby chic to go with my decor and I think it turned out quite sweet.


You get 10  raw wood pieces, 5 solid pieces and 5 cutout pieces to lay over the base. I didn't paint mine but simply covered them with designer paper and inked the edges with Frayed Burlap Distress Ink. I printed out the words onto pattern paper and then adhered each word to the heart base, making sure I centered it with the opening of the heart shape.


The small flowers are all from my stash and I dabbed white acrylic paint to the tops. I created the music sheet flowers with my Spellbinders Bitty Blossoms Die and then sprinkled the flowers with Glamour Dust.


I really like how each piece has a different "window" shape, so I accented each opening with mini flat back pearls. The pearls add such a pretty little detail.


Lastly I threaded a piece of jute through each of the holes and tied pretty pink bows in between each wooden heart piece.

My heart banner looks so pretty on my wall and best of all it reminds me to "Live, Love, Laugh every day". And at the end of the day that is all that really matters!

I hope you like my project. Head on over to Sacrafters shop and check out all her alterable products and don't forget to use my discount code "LIZFANS" to save even more.

Thank you so much for stopping by today! I'll see you all real soon.

Tuesday, April 28, 2015

Springtime in Paris Mixed Media Canvas

Welcome back to my blog! Today I want to share a very special project I created, recently, for Craft Source. Craft Source is a new, members only website, where for a $35 membership fee you can join and take advantage of deeply discounted craft products, bundled buys, exclusive tutorials and product review videos, monthly challenges and much more.They offer tons of bundled products and bulk buys. So the more you shop, the more you save and the products are discounted 15-35% everyday. Sometimes even more! For a limited time, the membership fee has been reduced to $25 so if you want to take advantage of this great offer you can sign up here.

Springtime in Paris

I started off with a 12x12 canvas and primed it with a light coat of gesso. Then I adhered two large pieces of music sheet to the top right and bottom left corners. I spread my homemade texture paste all over the canvas, heavy in some areas and lighter in others.Love this stuff because it creates such great texture and small cracks
.

I used a damask stencil and Faber Castell Whipped Spackle to create even more texture. Then I used  Lindy's Stamp Gang Flat Fabio sprays in T- Bird Turquoise and Ocean Breeze Blue and sprayed it all over the canvas. Because the Flat Fabios don't have any shimmer, I mixed up some Finnabair Mica Powder in Teal with a bit of water inside a spray bottle. I sprayed this mixture onto the canvas and even created drips along the flower clusters for a shadow effect.  Next, I went over the top of the damask texture with Faber Castell's Texture Gems in gold. I just dabbed it over the tops with my finger to add a gold shimmer. You can also see  some of the stamping I did with Fiannabair's Messy script stamp and the spattering of paint I created.


The theme of the canvas is Springtime in Paris, so I made sure to include tons of flowers on my project. The tree branches are cut from chipboard using Tim Holtz's Bird Branch die. I cut off the bird and glued 3 pieces together. Then I painted them a dark brown color and painted a coat of white acrylic paint on top of that. I distressed the branches with a sanding block to reveal some of the brown underneath. The tiny leaves are from an old punch and the small pink flowers are by Prima. I love the way the flower clusters turned out. You can see bits of cheesecloth and lace peeking out and the gold berries really pop!


The Eiffel Tower image is from the internet. I printed it out and framed it with a small frame from my local craft store. I dabbed the once green frame, with white acrylic paint and more of the gold Texture Gems using my fingers. The little resin birds are Prima Shabby Chic treasures also dabbed with Texture Gems, this time in platinum. I love the sheen, the Texture Gems create.


Where there are flowers, there are butterflies. I stamped some butterflies on vellum and heat embossed them with gold embossing powder. Then I just cut them out and placed them throughout my canvas.


I spelled out "Paris" with some alpha stickers dabbed with acrylic paint. Then I added Finnabair's Art Ingredients Glass Bleads in Crystal to the bottom left corner. There is some on the top corner too, but it gets covered by the flowers.

Almost everything I used to create my canvas can be found at Craft Source. They are your go to shop for just about all your crafting needs. Take advantage of the limited time membership offer of $25 and sign up today! 

Thanks for stopping by today, and I'll see you all real soon!