Wednesday, August 19, 2015

Cupcake Themed Projects for Sweet Thang Swap

Good morning crafty friends! Today, I want to share a few projects I created for a recent swap I participated in. The swap was hosted by Traci, the owner of Art Attack Supplies over on Facebook and it was a sweets themed swap. I chose cupcakes as my theme and we were to create a bottle cap charm, a card, an altered journal and an additional handmade goody of our choice.We also had to make sure our projects were all packaged up in a pretty fashion.


Here's the bottle cap charm that I created. I purchased the cupcake images on etsy, punched one out and covered it with an epoxy sticker. I added glass beads and cute metal charms to dangle from the chain. For the packaging, I used my Spellbinders Curvy Rectangles die and cut out a thin piece of chipboard and covered it with a piece of pretty pattern paper.I used thin wire to keep my bottle cap charm in place.


I embossed a small glassine bag, and placed the bottle cap charm inside. Then I added a paper doily and a cute tag I created using Spellbinders dies, Avery Elle's cupcake stamp set and coordinating die, and a wood clothespin.


Next up is the Cupcake card! I used some pretty pattern papers from my stash, tulle and a pretty doily to create layers for my card. The large cupcake was die cut from an older Sizzix die called Cupcake and Cherry. I did some stitching on the cupcake liner, created a seam binding bow and a little tag stamped hello. I think it turned out so cute! 


I created a coordinating card box to package the card. The box is made out of white card stock and then covered with pattern paper. I made a cute paper rosette and topped it off with a bottle cap and sweet cupcake image. The rosette is adhered to a white satin ribbon belly band.


And here's the altered journal. I found the journal at my local craft store, covered it with layers of card stock and pattern papers. Then I added a bit of lace and another paper doily. I found the vintage cupcake image online and thought it went perfectly with the papers.


The pretty roses are from my stash and are covered with Diamond Dust for that "sugared" look. Then I added the Spellbinders die cut leaves to my flower clusters for a fuller look. I added a laser cut word at the bottom to complete the sweets theme.


I kept the packaging simple by wrapping the journal in tissue paper and ribbon. Then I topped it off with a burlap rose and vintage tag.


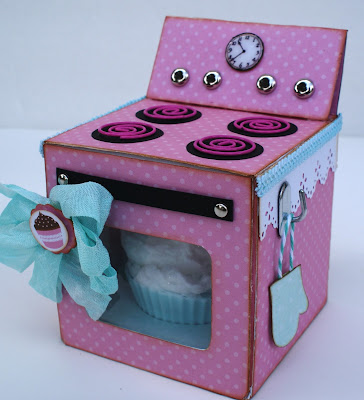
For my homemade goody of choice, I chose to make a cupcake shaped soap. It was my first time making soap and it was actually a lot of fun! I forgot to take pictures of the cupcake soap but you can see a little bit of it here, inside the oven box I packaged it in.


I found the oven box template here.(Thank you so much Marzi for the tutorial and template). I covered the box panels with paper as I was putting it together. Then I inked all my edges lightly with Vintage Photo Distress ink. I used metal brads for the "knobs", printed a tiny clock face and adhered it to the top. The burners are small circular paper clips I picked up at my local craft store.I also made a little oven mitt and hung it from a hook on the side of the oven box.


I added a strip of decorative card stock and braided trim on the sides of the oven box to pretty it up some more.Then I created a seam binding bow and topped it off with a tiny cupcake cut out.

I had a lot of fun creating all these projects and I sure hope my swap partner likes them!

Thanks so much for stopping by today!
I'll be seeing you real soon.

Thursday, August 6, 2015

"Mr. Skeleton in his Parlor" Halloween Shadowbox

Hello crafty friends! About two weeks ago, I walked into my local craft store to purchase some ribbon ( like I don't have enough, already) and witnessed the employees stocking the shelves with, with.. .(wait for it)....Halloween merchandise!!! Yes, you read that right! I literally let out a little shriek when I saw this beautiful sight. In case, you haven't guessed it yet, I really, really LOVE Halloween!
Halloween is  such a fun time of year for me and brings me  back to my childhood. Growing up, I was that shy little kid who wasn't afraid of creepy crawlies and made up games about monsters and ghouls . I loved a good scare( although nothing ever scared me) and I favored dark colored clothes over bright and cheery colors. I would often wear my hair in braids like my idol Wednesday Addams.Sure, people made fun of me but I loved that I was different. Fast forward 30 years later and my love for Halloween hasn't wavered one bit. My taste in clothes and color schemes sure has, and you couldn't pay me to pick up a spider or worm. But every Halloween season, that little girl gets to come back and live on in the spooky crafts and decor that now, bring a smile to my little girl's face. So for my first Halloween project of the 2015 season, I bring you "Mr. Skeleton in his Parlor"...

*WARNING, lots of pictures*


This is a GDT for Sacrafter's shop. I used her House Shadowbox #2 as well as her wood street light pieces to create this spooktacular shadowbox scene.


 I wanted a "shingled" roof so I cut small pieces of pattern paper, inked the edges with Black Soot and adhered them to both sides of the roof.


 I used Tim Holtz's Brick embossing folder on black card stock for the sides of the house. After embossing the paper I rubbed a metallic gunmetal paint on top to pick up the details of the bricks.
I made a little window out of pattern paper and the Movers and Shapers Openings dies.


I added little "rose bushes" on each side of the house. Love the way that gunmetal paint looks on the brick embossed papers.


For the floor, I used the  TH  Wood Grain embossing folder and created "planks" with my MS scoring board. Can you see Mr. Skeleton's scaredy cat by his side?


I love this cute little wreath! It's one of Tim's and I colored it with LSG in Passionate Plum, then sprayed it with adhesive before sprinkling with purple glitter. Then, I added the little orange stickers and the skull and crossbones Idea-ology piece.


The moon is made out of chipboard and colored with orange and yellow acrylic paint. I, then die cut the bats with the Movers and Shapers die and black, flocked paper.They're popped up on foam squares for dimension.


This is the back of the house and you can really see the details in the brick embossed paper.


Here's a closer look at the inside of the shadowbox. You can see Mr. Skeleton reading his newspaper in the comfort of his parlor. The frame in the background was fussy cut from the patterned paper then I stamped and embossed the skull image in the center. I found the little wooden chair, book and lamp in the miniature section of my local craft store. The small side table is actually a wooden spool, painted black and distressed with sandpaper.


Love how Mr. Skeleton is crossing his legs!

Phew, that was a lot of pictures but there were so many cute details I just didn't want you to miss. This piece was so fun to create and it's both creepy and fun. My daughter got a kick out of it and can't wait for me to create more Halloween pieces. Neither can I, bwahahaha!

Hope you liked my little project and thank you so much for stopping by.
I'll be seeing you...(insert maniacal laugh here).

Monday, August 3, 2015

"Confetti" Birthday Card

Hi guys! Today is my youngest daughter's 10 birthday!!! I cannot believe how fast time has gone by. I mean, I can still vividly remember the moment she was placed in my arms for the first time. How she looked up at me with those big brown eyes and melted my heart.Now, here we are ten years later and she still has that affect on me. So, I've got a fun filled day planned for her and she's going to empty my wallet, because I just can't say "no" to her ( and she knows it).But, hey, you only turn 10 once, right? Before we head off , I wanted to share the cute birthday card I created for her.


Isn't it cute? I used Maggie Holmes' Confetti collection for my card. I think the bright colors and patterns are so fun and fit the mood of the card perfectly!


I fussy cut images from the paper pad and used a few ephemera pieces from the collection for a layered look. The cute cake is one of the chipboard pieces from the collection as well.


 I die cut the little banner out of gold foil paper and then die cut the individual pennants with scraps from the collection. It looks so cute and adds a festive touch.


Lastly , I added a few gold sequins for a touch of sparkle.

I do hope my baby likes her card and now, I'm off to celebrate her birthday!

Have a great day and thanks for stopping by!!!