Showing posts with label design team. Show all posts

Thursday, August 6, 2015

"Mr. Skeleton in his Parlor" Halloween Shadowbox

Hello crafty friends! About two weeks ago, I walked into my local craft store to purchase some ribbon ( like I don't have enough, already) and witnessed the employees stocking the shelves with, with.. .(wait for it)....Halloween merchandise!!! Yes, you read that right! I literally let out a little shriek when I saw this beautiful sight. In case, you haven't guessed it yet, I really, really LOVE Halloween!
Halloween is  such a fun time of year for me and brings me  back to my childhood. Growing up, I was that shy little kid who wasn't afraid of creepy crawlies and made up games about monsters and ghouls . I loved a good scare( although nothing ever scared me) and I favored dark colored clothes over bright and cheery colors. I would often wear my hair in braids like my idol Wednesday Addams.Sure, people made fun of me but I loved that I was different. Fast forward 30 years later and my love for Halloween hasn't wavered one bit. My taste in clothes and color schemes sure has, and you couldn't pay me to pick up a spider or worm. But every Halloween season, that little girl gets to come back and live on in the spooky crafts and decor that now, bring a smile to my little girl's face. So for my first Halloween project of the 2015 season, I bring you "Mr. Skeleton in his Parlor"...

*WARNING, lots of pictures*


This is a GDT for Sacrafter's shop. I used her House Shadowbox #2 as well as her wood street light pieces to create this spooktacular shadowbox scene.


 I wanted a "shingled" roof so I cut small pieces of pattern paper, inked the edges with Black Soot and adhered them to both sides of the roof.


 I used Tim Holtz's Brick embossing folder on black card stock for the sides of the house. After embossing the paper I rubbed a metallic gunmetal paint on top to pick up the details of the bricks.
I made a little window out of pattern paper and the Movers and Shapers Openings dies.


I added little "rose bushes" on each side of the house. Love the way that gunmetal paint looks on the brick embossed papers.


For the floor, I used the  TH  Wood Grain embossing folder and created "planks" with my MS scoring board. Can you see Mr. Skeleton's scaredy cat by his side?


I love this cute little wreath! It's one of Tim's and I colored it with LSG in Passionate Plum, then sprayed it with adhesive before sprinkling with purple glitter. Then, I added the little orange stickers and the skull and crossbones Idea-ology piece.


The moon is made out of chipboard and colored with orange and yellow acrylic paint. I, then die cut the bats with the Movers and Shapers die and black, flocked paper.They're popped up on foam squares for dimension.


This is the back of the house and you can really see the details in the brick embossed paper.


Here's a closer look at the inside of the shadowbox. You can see Mr. Skeleton reading his newspaper in the comfort of his parlor. The frame in the background was fussy cut from the patterned paper then I stamped and embossed the skull image in the center. I found the little wooden chair, book and lamp in the miniature section of my local craft store. The small side table is actually a wooden spool, painted black and distressed with sandpaper.


Love how Mr. Skeleton is crossing his legs!

Phew, that was a lot of pictures but there were so many cute details I just didn't want you to miss. This piece was so fun to create and it's both creepy and fun. My daughter got a kick out of it and can't wait for me to create more Halloween pieces. Neither can I, bwahahaha!

Hope you liked my little project and thank you so much for stopping by.
I'll be seeing you...(insert maniacal laugh here).

Sunday, May 24, 2015

"Adorable" Gorjuss Girl Altered Photo Display

Happy Sunday everyone! I'm here again, to share another Guest Design Team project for Sacrafters shop. Today's project is a fun 3D scene I created with one of Sacrafters Photo Display units and an adorable Gorjuss Girl stamp. She carries several different styles of these fun, wood Photo Displays in her shop, as well as other awesome off the page products. You can check out Sacrafters store here and if you make a purchase of $30 or more, you can save an additional 10% off your purchase with my discount code "LIZFANS".


So here it is! Isn't it adorable? 
The unit was so easy to put together. First,I used a warm white acrylic paint to paint the parts that weren't going to be covered with paper. Then I used Prima's Princess 6x6 paper pad to cover the rest of the unit. All the edges were buffed with a sanding block then inked with Vintage Photo Distress Ink.


The Gorjuss stamp is called "Hang me up to dry". I colored the sweet image with my Copic markers and paper pieced the dress and cute little socks. I used foam tape to adhere the stamped image onto the hanging piece and then added those cute little cloud die cuts. Both the cloud die and the grass and flowers die are from the Magnolia Doohickey Club Volume 4.


Here, you can see the green ribbon I used to wrap around the unit. I love how it looks like vines. I then added those tiny, pink roses from my stash.


I used two Martha Stewart butterfly stamps to stamp onto scraps of paper using archival ink. Then I fussy cut them out, added pearls to the centers and adhered them randomly to the unit.


I knew it would be very difficult to cover the title with the pattern paper so I used paint instead. First I painted the letters with a warm white acrylic paint.Then I took a a script stamp inked with brown archival ink and randomly stamped onto the letters.Next,  I used a sponge dauber and dabbed pink, peach and white acrylic paint on top. Lastly I inked the letters with Vintage Photo Distress Ink. I really love the way the title turned out because it matches the papers so well.


The back of the unit is also covered with paper and here, you can see that cute picket fence I adhered to the posts. 

I really do love the way this project turned out. It was so fun and easy and just looks adorable in my daughter's room.
If you like this project, head on over to Sacrafters shop and check out the rest of her amazing off- the-page products. They are all constructed of high quality materials and so fun to alter. 

Thank you so much for stopping by today! I hope everyone has a wonderful Memorial Day.
See you all real soon!

Friday, April 24, 2015

Shabby Chic Castle

Hey guys! I just realized I haven't posted anything in over a month. I've taken on some new responsibilities and have been sooo busy!
Today I want to share a design team project that I created for Not2Shabby. This is actually my last month designing for Jamie's shop and I'm sure going to miss it. Jamie sent me an adorable set of stamps this month, including La La Land Crafts Sassy Princess Marci. As soon as I saw her I knew I had to do something involving a castle.. While perusing the aisles at my local craft store, I came across a castle birdhouse made out of wood and thought it perfect for my project.Check it out.

Sassy Princess Marci in her castle.

I painted the wooden birdhouse with Vanilla acrylic paint and Light Pink paint by Craftsmart. Then I used a stamp that resembled stone texture and Pumice Stone Distress Ink to stamp all around the walls of the castle.


It's very subtle, but you can see a little of the stone look, the stamp created.


I colored Marci's skin and hair using my Copic Markers and used gold Stickles on her crown.Her outfit was paper pieced using scraps from an old collection by Melissa Frances.


The flowers and vines along the castle walls were die cut using Magnolia Doohickey dies and cardstock. I really love the look of the vines against the castle walls.


I made a little flag for the top of the castle using my Spellbinders Banners die set and a bamboo skewer. Sassy Princess Marci comes with 3 sentiments and I chose the "once upon a time" sentiment to stamp onto the flag.I also created a mini flower bed out of a matchbox and some more Doohickey dies. Isn't it cute?


 Here's another full view from the side.

I think this piece would look so cute in a little girl's room or make for a cute centerpiece for a Princess theme party. Too bad my little one has outgrown her princess phase.

Head on over to Not2Shabby and don't forget to use discount code "LIZRUSELL" to get 10% off your purchase. Jamie always has the cutest stamps at amazing prices.
Thanks for stopping by and I'll see you all real soon!

Friday, March 20, 2015

Pretty Magnolia Tag made out of Packaging Material

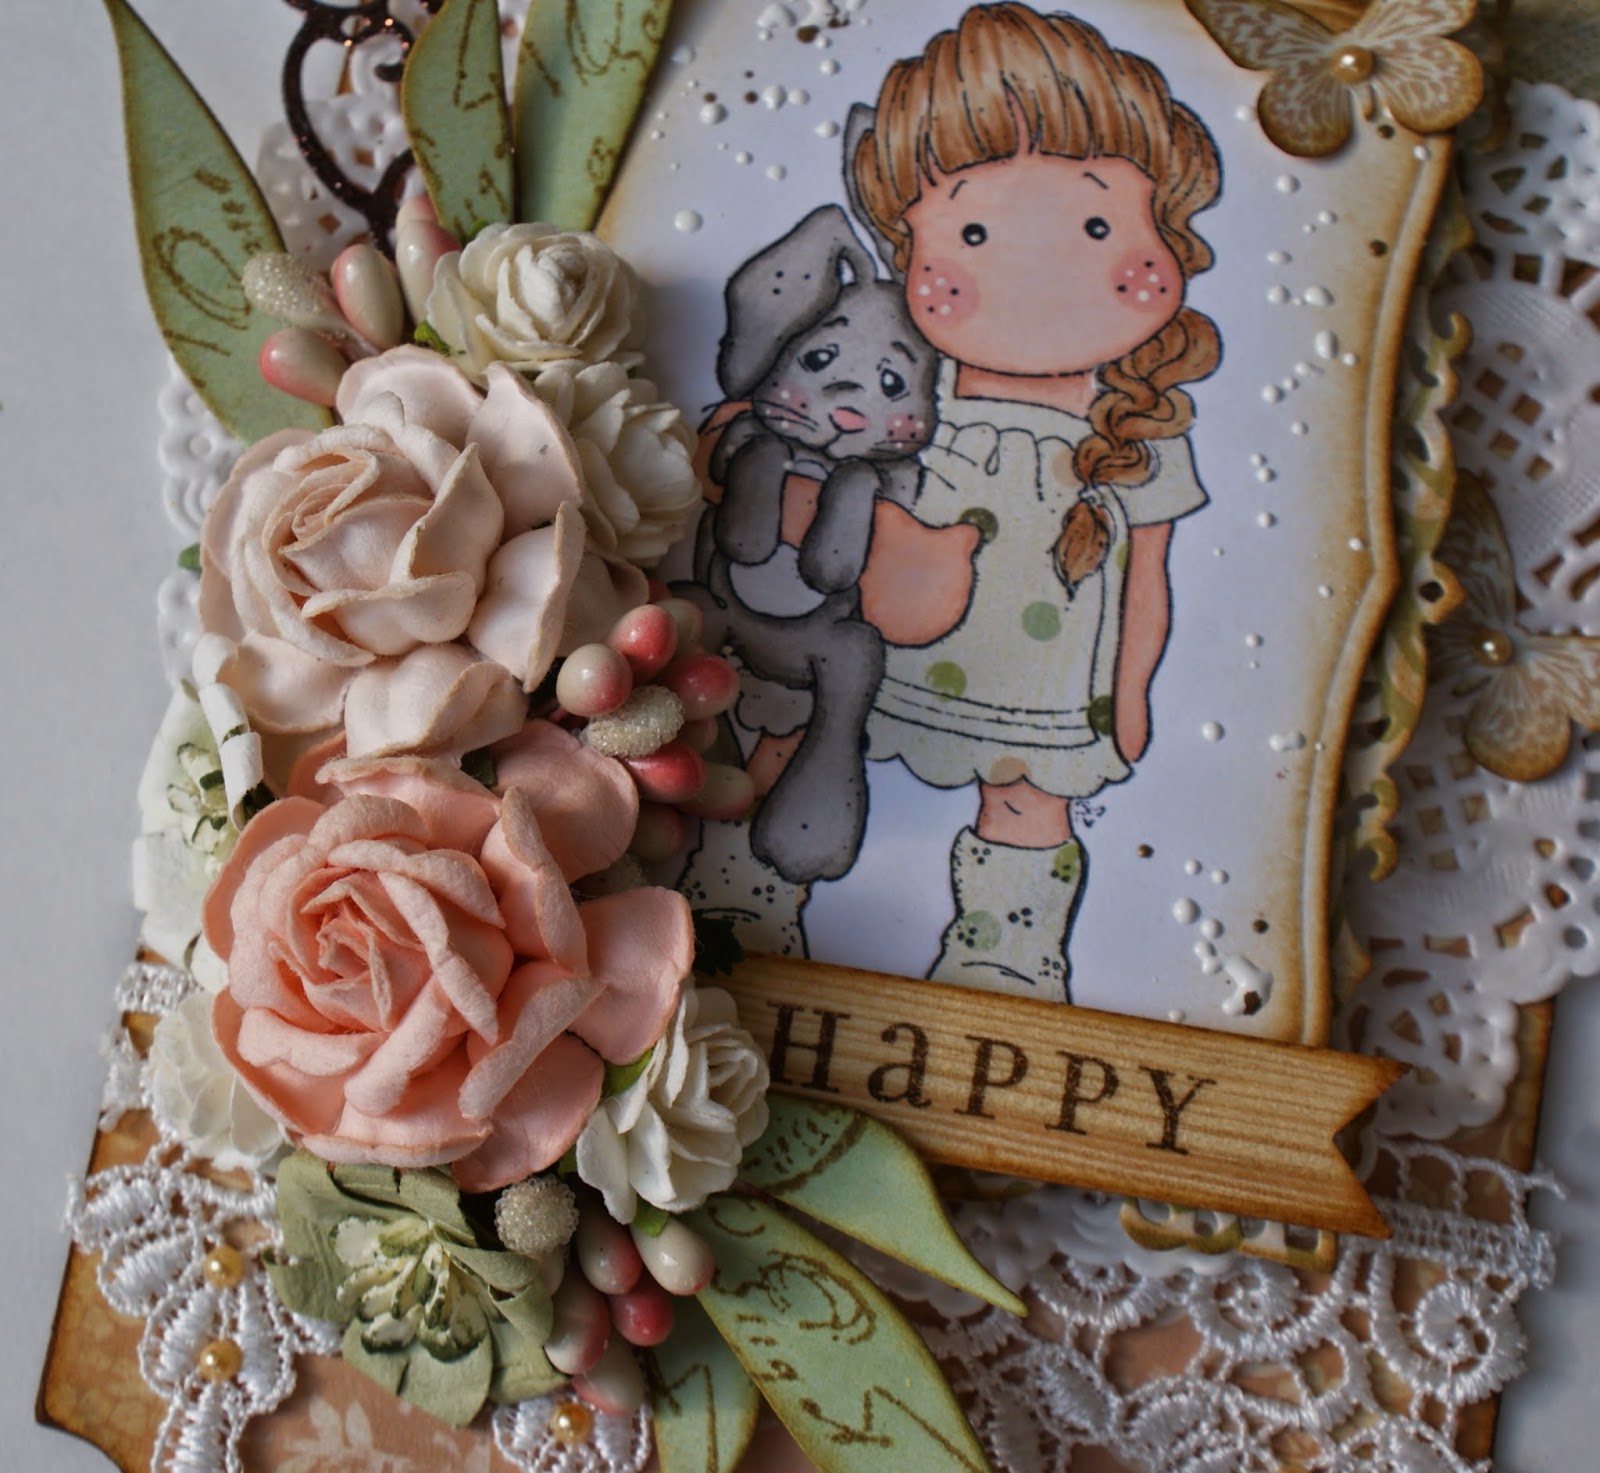
Hi guys and welcome back to my blog! Today I want to share with you a great idea on how to turn you embellishment packaging into pretty tags. Whenever I open a new package, I'm always looking for ways to re-purpose the packaging. Whether it be cardboard, plastic, netting, etc. The backing material on some of the embellishments, come in great shapes and can make for awesome tags. I've created a beautiful Magnolia tag out of Prima packaging as my design team project for Not2Shabby.


Turning your packaging into a pretty tag is quite easy. I always look for packaging that has a neat design or details, such as eyelets, as my base. Then you simply trace the packaging onto designer paper of your choice. Cut it out and adhere to both sides of your packaging material with your favorite adhesive.


So here's the pretty tag I created using the sweet Magnolia image. It's called Tilda with Hanging Rabbit and you can purchase it here. I've used Colorbok's Victorian Parlour collection to cover the tag and inked all the edges with Brushed Corduroy Distress Ink. I also busted out my Doohickey dies and some pretty laces I had in my stash.


I colored the image with my Copic markers and I paper pieced her dress and boots. I also added Frantage in Shabby White around the image for more detail. It's my first time using it and I love the way it looks!


The flower cluster turned out so pretty. I just used flowers from my stash and these cute little pips I picked up at my local craft store. The leaves are from the Doohickey Club Dies Volume 4 and I stamped on them and inked them with Brushed Corduroy. The wood banner has been in my stash for ages and I thought it would make for a perfect sentiment on my tag.

I hope I've inspired you to look at your "trash" in a whole new way. I think I'll be making a few more of these tags!
Head on over to Not2Shabby and take advantage of Jamie's flash sale going on now until Sunday March 22. Almost everything in the store is 10% off and if you use Discount Code "LIZRUSSELL" you will get an additional 10% off your purchase. What a great deal!

Thanks for stopping by and I'll see you all real soon!

Thursday, February 26, 2015

Spring Garden Card-in-a-box

Hello there crafty friends! Today was the first time I've seen the sun in what seems like forever. It's been so dark and gloomy, here in Spring, Texas.. Now I know I shouldn't complain when some of you are dealing with 6 feet of snow and blizzards, but I'm just so ready for warmer weather. Aren't you? So in my attempts to get myself ready for  spring , I  created a garden themed card-in-a box. This is only the second time I've made one of these cards and I have to say they are so much fun. Not to mention adorable!


 The card is a Design Team project for Not2Shabby. I used an older paper collection by DCWV called The Preppy Princess Stack. I just love the soft colors and the images, perfect for fussy cutting.


The sweet image stamp is by C.C. Designs, called Rose. I've used her before on another card and I think she is just precious. I stamped the image onto watercolor paper and then colored her skin and hair with watercolors. I paper pieced her outfit using scraps from the paper pad.


I used 4 strips inside my card to get a fuller look for the garden. I love how it looks like she's standing in the middle of all the flowers. I die cut the  little fence from a Magnolia Doohickey die and the cute little clouds are felt stickers from my stash.


The sentiment was fussy cut from the paper pad as well as all the flowers on the side panels. I added cute little pearls to the flower centers.


This is the back of the card where I can write my message to the recipient. Some simple fussy cut elements adorn the corners.

 I think it turned out so cute and I really cannot wait for my roses to bloom come Spring.I really miss seeing all the beautiful colors in my garden.

Hope you like my card! Head on over to Not2Shabby to get the best deals on all your favorite image stamps. Use discount code "LIZRUSSELL" for 10% off your purchase.

Thank you so much for stopping by. Hope you all have a great day!

Wednesday, February 11, 2015

Free Standing Pop Up Card for Not2Shabby!

Hello there, crafty friends! Today I want to share with you another Design Team project for Not2Shabby. I made a free standing pop up card for my mom, for Valentine's Day.


Isn't it cute? I found the tutorial for the card on Splitcoaststampers but I modified the dimensions to fit the sweet image. 


The image stamp is another cutie by C.C. Designs, called Rose. I colored her with my Copic markers and added Stickles to the heart on her headband and dress.
The oval die cuts are by Spellbinders and I rimmed the outside oval with small rhinestones.


You can see here how it stands up on it's own.


Here, you can see how it folds up for easy mailing.

 This card was very easy to put together and I really love the way it turned out. I hope you like it too!

Head on over to Not2Shabby  for the best deals on stamps and other crafty goodies. Dont' forget to use discount code "LIZRUSSELL" for 10% off your purchase.

Thank you so much for stopping by and I hope to see you all real soon!

Tuesday, April 8, 2014

DiscountPaperCrafts April Card Kit

Happy Tuesday everyone!
I'm looking outside my window right now and boy, is it gorgeous outside! Makes me wonder what I'm doing inside typing on this computer,lol. I literally can hear birds chirping and everything looks so green outside. The trees have gotten all their leaves and my roses are starting to bloom. I can't wait to see in them fully bloomed, in all their glory. I just know they're going to be gorgeous!
You know what else is gorgeous? The April Card Kit from DiscountPaperCrafts, of course! Cathie put together another beautiful kit and Kaylah and I had so much fun working with it. The kit features Kaisercraft's Telegraph Road paper pad and the coordinating collectables. The collectables make it so easy to put together fabulous cards and tags. You also get flowers, trims, Cheery Lynn doily die cuts and even the cardstock! It truly is a complete kit all on its own. We barely had to reach for our stash to complete our projects. Let me show what we created.

 
Just look at everything we made with the kit: 3 cards, 1 tag, and 2 favor boxes. And there's still plenty more paper left to create more!


These are the two favor boxes we created. I love the size of them and they are so simple to make. A few die cut pieces on top is all the embellishment they needed, since the paper is so pretty.
 
 
We filled our boxes with shredded tissue, added some mini cupcake liners and filled them with sea salt caramels. But, you can fill them with whatever you like. I think these make for a cute little gift.
 
 
Here's the first of our cards. It measure 5 1/2 x 5 1/2. We layered several pieces of pattern paper and used lots of die cuts from the coordinating Collectables pack. I love how the Cheery Lynn doily accents the sweet sentiment die cut. Some pretty flowers and die cut leaves add a cute touch.
 
 
This card turned out so pretty too. I love the pops of red and the sweet little bird die cut.
 
 
 Our last card was the easiest to make. We didn't want to cover up that cute cluster with the bird and vintage phone. So we fussy cut it out from a second piece of pattern paper and used foam tape and adhered it to the card to give it a 3D look. I created a few little banner pieces using some scraps and added a border strip on top. I just knew I was going to use that sentiment for this card because of the phone. So cute!
 
 
Last, but not least is our tag. We created the tag out of some leftover cardstock and covered both the front and back with pattern papers. Kaylah really wanted to use the other Cheery Lynn doily and so we cut it in half and placed it on the left of the tag. Then we added some flowers and die cut leaves to create a little cluster. Some more die cut Collectables and pearl string complete the look of the tag.
 
We hope you like what we've done with Cathie's wonderful kit and we really encourage you to get your hands on one. Cathie always puts together the best kits and this one is just jammed packed with goodies. You really don't need much else to create beautiful projects. You can purchase your kit here:
 
Thank you so much for stopping by and we hope to see you real soon!