Showing posts with label Tim Holtz. Show all posts

Thursday, August 6, 2015

"Mr. Skeleton in his Parlor" Halloween Shadowbox

Hello crafty friends! About two weeks ago, I walked into my local craft store to purchase some ribbon ( like I don't have enough, already) and witnessed the employees stocking the shelves with, with.. .(wait for it)....Halloween merchandise!!! Yes, you read that right! I literally let out a little shriek when I saw this beautiful sight. In case, you haven't guessed it yet, I really, really LOVE Halloween!
Halloween is  such a fun time of year for me and brings me  back to my childhood. Growing up, I was that shy little kid who wasn't afraid of creepy crawlies and made up games about monsters and ghouls . I loved a good scare( although nothing ever scared me) and I favored dark colored clothes over bright and cheery colors. I would often wear my hair in braids like my idol Wednesday Addams.Sure, people made fun of me but I loved that I was different. Fast forward 30 years later and my love for Halloween hasn't wavered one bit. My taste in clothes and color schemes sure has, and you couldn't pay me to pick up a spider or worm. But every Halloween season, that little girl gets to come back and live on in the spooky crafts and decor that now, bring a smile to my little girl's face. So for my first Halloween project of the 2015 season, I bring you "Mr. Skeleton in his Parlor"...

*WARNING, lots of pictures*


This is a GDT for Sacrafter's shop. I used her House Shadowbox #2 as well as her wood street light pieces to create this spooktacular shadowbox scene.


 I wanted a "shingled" roof so I cut small pieces of pattern paper, inked the edges with Black Soot and adhered them to both sides of the roof.


 I used Tim Holtz's Brick embossing folder on black card stock for the sides of the house. After embossing the paper I rubbed a metallic gunmetal paint on top to pick up the details of the bricks.
I made a little window out of pattern paper and the Movers and Shapers Openings dies.


I added little "rose bushes" on each side of the house. Love the way that gunmetal paint looks on the brick embossed papers.


For the floor, I used the  TH  Wood Grain embossing folder and created "planks" with my MS scoring board. Can you see Mr. Skeleton's scaredy cat by his side?


I love this cute little wreath! It's one of Tim's and I colored it with LSG in Passionate Plum, then sprayed it with adhesive before sprinkling with purple glitter. Then, I added the little orange stickers and the skull and crossbones Idea-ology piece.


The moon is made out of chipboard and colored with orange and yellow acrylic paint. I, then die cut the bats with the Movers and Shapers die and black, flocked paper.They're popped up on foam squares for dimension.


This is the back of the house and you can really see the details in the brick embossed paper.


Here's a closer look at the inside of the shadowbox. You can see Mr. Skeleton reading his newspaper in the comfort of his parlor. The frame in the background was fussy cut from the patterned paper then I stamped and embossed the skull image in the center. I found the little wooden chair, book and lamp in the miniature section of my local craft store. The small side table is actually a wooden spool, painted black and distressed with sandpaper.


Love how Mr. Skeleton is crossing his legs!

Phew, that was a lot of pictures but there were so many cute details I just didn't want you to miss. This piece was so fun to create and it's both creepy and fun. My daughter got a kick out of it and can't wait for me to create more Halloween pieces. Neither can I, bwahahaha!

Hope you liked my little project and thank you so much for stopping by.
I'll be seeing you...(insert maniacal laugh here).

Sunday, July 12, 2015

Tilda Altered Tray Embellishment Center w/ 3D Tea Cups

Happy Sunday everyone! Today, I'm coming at you with my first GDT project for Sacrafters shop, for the month of July.  Sa sent me so many awesome goodies to alter and I always get so excited when I'm asked to guest design for her shop.One of the first things I noticed, in my DT package, was a cute little serving tray. Having recently picked up Tim Holtz Tea Time die, I thought of a great way to incorporate the two into a cute embellishment center. Check it out!


This is the largest of the serving trays available in Sa's shop and was so easy to put together. I painted all the exposed parts with Bleached Sand acrylic paint by Americana and then I covered it with papers from Tilda's Tiny Treasures paper pad. I just adore this paper pad for all it's sweet images and gorgeous papers! 


All the edges were distressed with a sanding block to give it an aged look. Then I adhered a pretty floral trim all around the tray and flat back pearl trim on top of that.


I created small flower clusters on each handle side with die cuts from the paper pad and flowers from my stash.


I'm so in love with the gorgeous prints of this paper collection.
So shabby chic!


The sweet tea cups were created with Tim Holtz Tea Time die. I die cut the tea cups and saucers from the paper collection and made them 3D. If you're interested to see how I did that, go check out my mini tutorial, here.


I added a flower die cut piece to the front of each tea cup. Then I made the cute little tags and glued them to the inside of the tea cup. I filled each tea cup with shredded tissue and tiny fabric flowers. And now I have a really cute embellishment center for my craft table! I can switch out the embellishments to suit the project I'm working on and the tray serves as a pretty decor piece.

I hope you like my project and I encourage you all to check out Sacrafters shop. Her off the page products are so unique and so much fun to alter. You can use my discount code "LIZFANS" for 10% off your purchase of  $30 or more.

Thank you so much for stopping by today! Hope to see you all real soon!
Have a great day.

Thursday, June 25, 2015

"Oh So Lovely" Altered Photo Display Tray

Welcome back crafty friends. It's been a few weeks since I posted anything on my blog, but I got a good reason, I promise. You see, I uh...lost my mojo. I know, I know, that's crazy right? I tried and tried to sit down and create something pretty, but my mind was just  blank. Nothing was coming to me and I was just dying to create!After several days of ,well, nothing, I decided to take a break and just ride this one out. I've been stressing out a lot lately and I think that had a lot to do with me not being able to create. I knew my mojo wasn't gone forever ( or so I hoped). I think I just needed a little  "me" time with no DT projects and commitments. Sure enough, a few days ago, I was finally able to sit down and like magic, all my creative juices started flowing again! Yippee, my mojo was back! I've never been happier to get my hands all inky and create a mess in my craft space,lol. Today I'm sharing the fruits of my labor, a true labor of love.


You have no idea how happy it made me to finally craft! I had recently purchased Kaisercraft's "Oh so Lovely" paper pack and I was inspired by the beautiful mother/daughter sentiments throughout the collection. So, I decided to alter a photo tray, I had picked up at my local  craft store, and create a tribute to the special bond I have with my girls.


I wanted the tray to be bright, fun and feminine. The girls and I took silly selfies that I changed to black and white to coordinate better with the paper collection. I added bits of lace and sweet feminine touches throughout the tray.


I love the look of bare wood embellishments,that's why I left the word "Smile" as it was. The frame was die cut from chipboard and pattern paper and then I cut it in half.The sentiment in the center is from the coordinating Collectables pack by Kaisercraft.


 This is the sentiment that inspired the entire tray. I popped it onto another die cut piece and layered it over a paper doily. The birdcage was fussy cut from the collection and I also added two glass vials on the lower right hand corner. The vials are filled with tiny beads from my stash.


 Here's a silly picture of my oldest daughter and I . She has a habit of taking pictures with half her face gone,lol. I added a cute resin bicycle and lots of handmade flowers. The words are stickers that I cut up and popped up with foam tape.


I created a cute little banner to spell out "Love" and adhered it to the top of the compartment. Here's another silly picture of my little girl and I.A bit of lace and pearls round out this compartment.


For this compartment, I created a little "art journal" using Spellbinders Labels 7 dies. I created a little book and used a script stamp to stamp on the pages. I cut out the individual words from a sticker phrase.


All of the gorgeous flowers were handmade out of coffee filters. You can check out my coffee filter flower tutorial here.

Thank you so much for stopping by today! Hope to see you all real soon.

Thursday, May 14, 2015

Tags of 2015, May

Hi everyone! Today I want to share my take on Tim Holtz's May tag. Unfortunately, I didn't get a chance to play along in April but I made it a point to make time for this month's tag.  Especially when I saw how gorgeous it was! Tim really did an amazing job with this one. I loved everything about it from the burlap, to the vintage photo, to the handmade blooms. It was just stunning!

 May 2015 Tag

I worked on my tag the day before Mother's Day and as I was going through the Photo Booth  photos, I came across one that reminded me so much of my mother, when she was young. I just knew that was the one I was going to use and I decided to play tribute to my mom's love of sewing on my tag.I followed Tim's steps exactly but just improvised with products I had on hand.


Here's a closeup of the photo I used. I tinted it with Worn Lipstick, Tumbled Glass and Wild Honey Distress Markers.The ephemera pieces I selected worked really well with the sewing theme I was going for and I even added a little scissors charm to the top of my tag.


I love the way the flowers turned out, so pretty and vintage. I didn't have Tim's Mini Tattered Florals dies so I had to improvise with Spellbinders Bitty Blossoms dies. I die cut them out of Coredinations card stock and dabbed them with Walnut Stain Ink to give them that vintage look.


The pretty pink bow is made out of crinkled seam binding colored with Worn Lipstick Distress Stain. I just love how vibrant that pink looks. Then I just added the little Small Talk stickers and done!

I'm so in love with the way it turned out!!! Every time I look at it, it reminds me of my mom, and that just makes my heart happy!

There's still plenty of time left for you to play along. It really was so much fun working on this tag. Bring on the next one!

Thanks for stopping by today. I hope your day is a blessed one.


Sunday, March 15, 2015

Tags of 2015, March

The sun is out!!! The sun is out!!! Sorry, I just couldn't contain my joy, lol. After not having seen the sun in so long, I can't help but be happy! So in honor of the beautiful sun and the warm weather to come, I created a Spring inspired tag as my take on Tim' March tag.


I followed Tim's techniques to create the background on the tag, but just switched up the colors. You can check out Tim's tag here.Since I wanted to go for a shabby look, I used Distress paint in Broken China, Antique Linen, Victorian Velvet, Bundled Sage, and Brushed Corduroy.The effect was so pretty and I think it's just perfect for Spring. 


I used my homemade texture paste and gold embossing powder to create the really cool enamel look. The butterfly stamps are from my stash and I stamped them with Archival Ink and covered them with clear embossing powder. The crinkled seam binding bow was dyed with Victorian Velvet. It's such a beautiful color!


I added a word band with some jute rope at the bottom of the tag. Then I embellished the tag with Tim's Metal Foliage. I dabbed the metal pieces with Distress Paint to give them a more shabby look too.
Overall, I think it turned out very pretty and it was so much fun to create. You still have plenty of time to play along, so head on over to Tim's blog and check out his awesome tutorial.

Hope you like my tag and thanks so much for stopping by!

Tuesday, February 17, 2015

Tags of 2015, February

Hi guys! Today, I'm going to share my take on Tim Holtz's February tag. I just loved Tim's version so I stuck very closely to his original design.

February Tag


First, I created the background using bits of the Wallflower paper pad since I didn't have the ephemera pack. I sealed it and added the shadow effect with the Black Soot Distress marker and splattered a little bit of black paint on top. I wanted to soften up the edges of the tag so dabbed Picket Fence Distress Paint on all the edges, after sanding them lightly with the sanding block.


I don't own the Movers and Shapers heart die so I had to create my own out of chipboard. I cut 3  hearts by hand and glued them together for dimension. Then I painted the heart red and used glossy accents to cover it with Festive Berries Distress Glitter. I just really felt like having some sparkle on my tag!The tiny key hangs from the heart with a piece of embroidery floss and since I didn't have a word band I used Chit Chat and Label stickers to create my sentiment.


I really liked the way Tim attached the heart charm to the arrow so I did it the same way.Then added bits of lace and a mini corner on the bottom left corner of the tag. I topped off my tag with a seam binding bow and Voila!

Loving the way it turned out and I cannot wait to see what Tim has in store for us for March! 
Thanks for stopping by and have a wonderful day!

Sunday, January 25, 2015

Tim Holtz Tags of 2015, January

Hi everyone! I hope you all had a wonderful New year. A new year means 12 months of new tags, yay! Tim started off the year with a bang and created such a gorgeous tag for January. I finally found some time to create it, so here's my take on this month's tag.

January Tag

I was so glad to have almost all the products Tim used on his tag, to create my own. I followed Tim's techniques for the background but I used Broken China, Weathered Wood, Peeled Paint, and Antique Linen Distress paint.


The words were painted with Tarnished Brass Distress paint. I crinkled and dyed seam binding to create the bow on top of the tag.


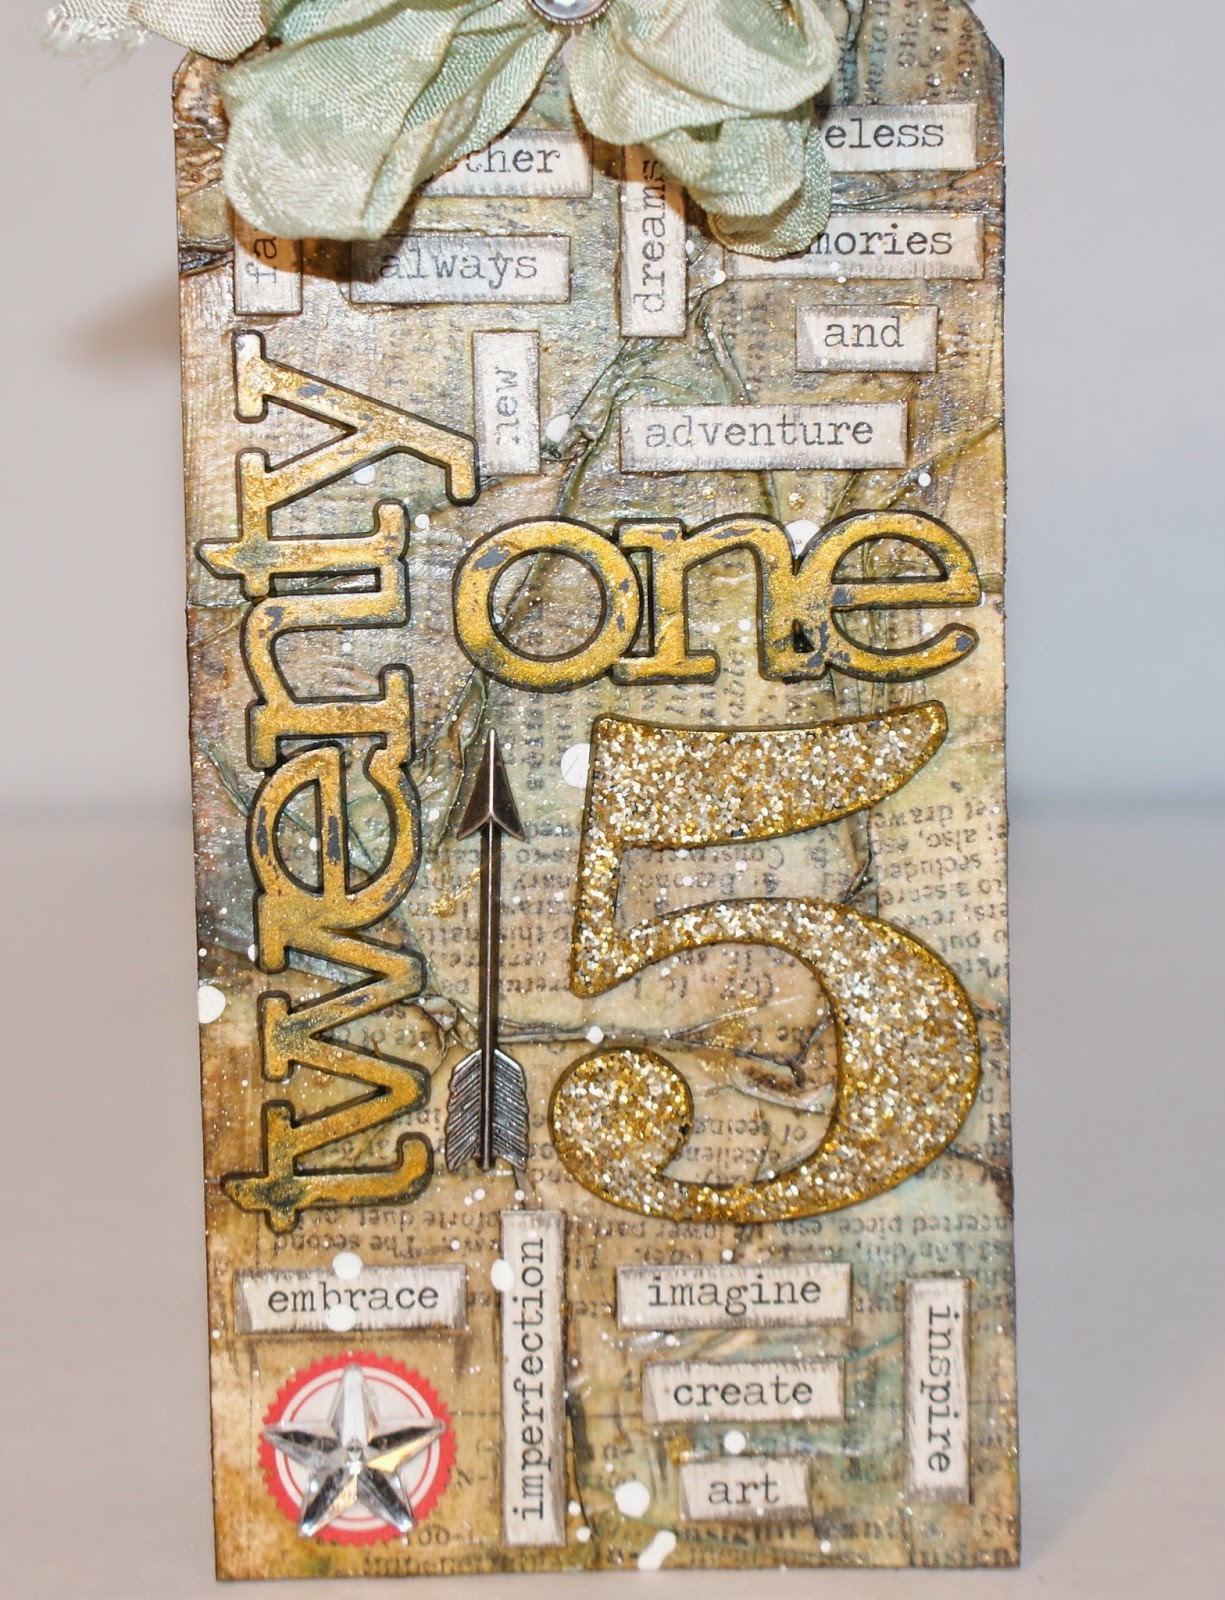
I didn't have Tarnished Brass Distress Glitter so I used Antique Linen and just dabbed Tarnished Brass distress paint on top of the glittered number, using my finger. All the chit chat stickers used are for my New Year's resolutions. I want to spend more time with my family, have new adventures and create timeless memories. The bottom portion of the tag is my resolutions for crafting.To embrace imperfections, continue to imagine, create and inspire.

So there you have it, my take on Tim's January tag. There's still plenty of time to play along.
Thanks for stopping by!

Monday, December 15, 2014

12 Tags of 2014, December

Welcome back! Today I want to share with you my take on Tim Holtz's December tag. It has been so much fun participating in the monthly tags and I'm so proud of myself for playing along  each month. Well...I did miss August and September, due to my move, but I won't tell anyone if you don't, hehe. The tag for December was amazing , like all of Tim's tags! Again, I was without a lot of the products he used, but it's always fun to work with what you've got. So enough babbling, let me show you what I came up with...

December Tag

It's very different from Tim's but I think it turned out rather cute. I created the background with a combination of Chipped Sapphire and Weathered Wood Distress Stains for a dark winter day look. Then I embossed a piece of Frosted Film (didn't have the new Frosted Sheets) with a snowflake embossing folder from my stash and adhered it to my tag. I love the shimmery effect of the frosted film and the subtle embossing. To create the look of snow, I splattered white paint on the surface and dabbed Snow-Tex all over the tag.


I hope you can see the shimmer and the embossing from this angle. Believe me, it's there and looks gorgeous in person.


I don't own the Prancing Deer die so I used one of the deer from Reindeer Flight. I cut out 3 deer out of chipboard and glued them together for dimension.  The deer was colored  with light brown acrylic paint mixed with Antique Linen,then I sanded and inked the edges with Walnut Stain. I did add Distress Glitter in Rock candy and dabbed Snow-Tex on the deer to make it look like falling snow.
As for the greenery, I used the branches from the Tattered Pinecone die. I cut them out of watercolor paper and used Peeled Paint Distress Stain to color them. Then I just lightly sprayed them with a shimmery silver spray from my stash and dabbed some Snow-Tex ( can you tell I love this stuff)?
 

The branches are from the Branch Tree Die. I cut three out of chipboard and layered them for dimension. Then, I inked them with Walnut Stain and heat embossed them with Walnut Stain Embossing powder. This is my favorite technique to create realistic looking branches. You can see more of that snowy stuff on my branches and one last, little green leaf just clinging on for dear life. The scene really does look like a Winter Wonderland and makes me long for a white Christmas. I topped of my tag with a crinkled ribbon bow dyed with the stains used to color the tag.

Well, that is it for me today! I had so much fun creating this month's tag and there's still plenty of time to play along, if you haven't already.

Can't wait to see what Tim comes up with for the New year.
Thanks for stopping by!

Monday, November 17, 2014

12 Tags of 2014, November

Hi all! I'm back to share my take on Tim's November tag. I'm so proud of myself for not waiting till the last minute to make my tag, hehe. Tell me what you think;

November Tag

As you can see, it's quite different than Tim's version but still has some similarities. I created the background with Distress Paints in Mustard Seed, Wild Honey, Rusty Hinge and Peeled Paint. Tim used corrugated board on his tag but I really wanted a rustic look, so I used the wood grain embossing folder. I dabbed  Walnut Stain Distress ink on the raised surface of my embossing folder before running it through my Big Shot. Tim shared this technique on a past tag and it's still one of my faves.


I don't have the Leaf Die so I had to improvise with an old leaf punch from my stash. I punched out 3 leaves out of Kraft Glassine and colored them with Distress Stains. I then crinkled them up in my hand and dabbed them with the  Walnut Stain ink pad and sponged gold acrylic paint on top. I also used the Tattered Pine cone die to create the little pine cones and some of the greenery. I sponged gold acrylic paint on the greenery and pine cones as well.


I threaded a piece of linen ribbon through the Alpha Parts words and tied it around my tag.
Then, I tied some dyed seam binding through the hole on  the tag and added chit chat stickers on the top corner. Lastly, I sprayed the entire tag with Perfect Pearls Mist in Heirloom Gold for some added shimmer. So, so pretty and just perfect for Fall.

Thank you so much for joining me today and I hop you like my tag. There's still plenty of time for you to play along.

I'll see you all real soon!

Saturday, October 25, 2014

12 Tags of 2014, October

Hi guys! Got a real short post for you today. Just wanted to share my take on Tim's tag for the month of October. I wasn't able to participate in August and September because of my move, but I just couldn't pass up on October's Tag!


Halloween Tag 

I loved Tim's tag from the moment I saw it but was a little disappointed that I didn't have most of the products he used. So I had to improvise quite a bit. First, I  made my own homemade texture paste and used a tree stencil on my background. I had this cute little owl stamp and I wanted it to look as if the owl were perched on one of the branches.As for the color sprays, I had to use some Tattered Angels sprays I had on hand. I must say I was a bit disappointed with the colors and just know Tim's Distress Sprays would have looked so much better! Definitely have to add those to my wish list.


The little jack-O-lantern is an old Sizzix die, I die
cut out of chipboard. I inked it with Spiced Marmalade, Rusty Hinge, and Vintage Photo. Then I covered it with clear embossing powder. The letter squares are stickers I had in my stash and I added tiny little half back pearls painted in gunmetal to mimic the look of nail heads.


I added the monocle and wishbone and tied some black tulle at the top to finish my tag.
So there it is, my take on Tim's October tag. Can't wait to see what he comes up with for November.
Have a great day everyone!