Saturday, October 25, 2014

12 Tags of 2014, October

Hi guys! Got a real short post for you today. Just wanted to share my take on Tim's tag for the month of October. I wasn't able to participate in August and September because of my move, but I just couldn't pass up on October's Tag!


Halloween Tag 

I loved Tim's tag from the moment I saw it but was a little disappointed that I didn't have most of the products he used. So I had to improvise quite a bit. First, I  made my own homemade texture paste and used a tree stencil on my background. I had this cute little owl stamp and I wanted it to look as if the owl were perched on one of the branches.As for the color sprays, I had to use some Tattered Angels sprays I had on hand. I must say I was a bit disappointed with the colors and just know Tim's Distress Sprays would have looked so much better! Definitely have to add those to my wish list.


The little jack-O-lantern is an old Sizzix die, I die
cut out of chipboard. I inked it with Spiced Marmalade, Rusty Hinge, and Vintage Photo. Then I covered it with clear embossing powder. The letter squares are stickers I had in my stash and I added tiny little half back pearls painted in gunmetal to mimic the look of nail heads.


I added the monocle and wishbone and tied some black tulle at the top to finish my tag.
So there it is, my take on Tim's October tag. Can't wait to see what he comes up with for November.
Have a great day everyone!

Wednesday, October 22, 2014

DIY Halloween Home Decor!

Hi everybody! It's my most favorite time of year again! Oh, how I looove Halloween! Every year I look forward to the leaves changing and counting down the days till the most spookiest of days. I think I get more excited than my kids,lol.
This year I decided to create some Halloween decorations that will serve me well year after year. Sure, I love buying decorations from the store but there's just something about making your own that makes it so much sweeter.
So just sit back and check out my creepy decorations. Hopefully I'll inspire you to create your own.

"Wicked" Wall Hanging

I made this wall hanging using 3 silver Dollar store trays. I primed them and spray painted them black and glued them together using E6000.


The paper collection is called Wicked by My Mind's Eye and it's just perfect for Halloween projects. The first tray is a creepy cemetary scene where the dead are waking up from their graves trying to make their way to the most awesome Halloween bash in town! I used several Tim Holtz dies to create the creepy ambiance.


The middle tray depicts the haunted house where the awesome Halloween bash is being held. Our gracious host greets us at the door and beckons us to go right on in. 


And here's the last tray depicting the inside of the house all decked out for the bash. I did a lot of fussy cutting on this project to create layers and a more realistic scene. The "flames" were created from pieces of a glittery floral pick from my local art supply. Pretty cool, don't you think?

Creepy Witch's Lair Countdown

I created this project for my baby girl who enjoys counting down the days till Halloween. She looks forward to changing the blocks each morning. This is such a fun and inexpensive project and can be changed for any holiday. All you need is 2 wood blocks, small wood base and some heavy weight chipboard.


I love the way the cauldron turned out, looks so grungy and rusty! Check out the little bottles on the shelf too. 

Last but not least....
Eek! Halloween Wreath

I'm loving the way my wreath turned out. I started with a grapevine wreath from the store, spray painted it black and added lots of dollar store finds. 


I grunged up the skull with black acrylic paint and some damp paper towels. Then I added lots of flowers, leaves and glittery berries. 


I spelled out "eek" using some wood letters painted blurple ( combination of black and purple silly), then topped with fine glitter.

Well, that's all for now. I had so much fun creating these spooky projects, now to get started on Christmas!

Goodbye, I'll see you all real soon!

Thursday, September 18, 2014

Kaisercraft 75 Cents Mixed Media Canvas, Card & Decorated Glassine Bag

Hello there scrappy friends! I'm finally back after what seems like an eternity! But boy it was one crazy summer let me tell you!
My move was by far the worse move ever ( and we've moved around quite a bit in the last 7 years)! It just seemed like everything that could go wrong did and then some. Like not fitting all our stuff into the biggest moving truck we could find, and having to make 3 trips! Ugggh! Then our power was shut off because hubby and I assumed the other had called the electric company to make arrangements for service ( which neither one of us did). It was on a Friday and they said power would not be back on until the following Monday. I'm surprised we made it 3 days without air conditioning in this Texas heat, without killing each other! I'm just so glad summer's over and we've gotten back to our normal routine. I've even had a chance to do some crafting, so let me share with you what I made...

Mixed Media Canvas

I made this canvas for a very special lady I met on Youtube. She is undergoing chemotherapy and has lost all of her hair. I can't even begin to imagine how hard it must be to have to go through such an ordeal. Personally,  I don't know how I would handle this situation.
But I would hope that I would have half the strength she has, because she is the most amazing and courageous woman I've ever known. I admire her so much for her positive attitude and her unwavering faith. Nothing can bring her down, I tell you! She is that  amazing!


Here's a closeup of the sentiment on the canvas. This special lady loves flowers so I made sure to incorporate lots of lush blooms to my canvas. I used Spellbinders Floral Ovals and Large Ovals Dies along with scraps from Kaisercraft's 75 Cents paper collection for the focal point of the canvas.


 I  created the background with a damask stencil and gloss gel medium.Then I used several ink sprays, Ferro special effect paste, and acrylic paint to create a grungy, yet feminine look.

Thinking of You Card

I also made her a card to coordinate with her canvas. Here, I used Spellbinders Opulent Ovals dies and some pretty paper doilies. 


Here's another view of the card. I finished the inside to match the outside of the card as well.

Decorated Glassine Bag

Last, but not least, I decorated a medium size glassine bag to round out her gifts. I wanted to send her some pretty laces so I wrapped them around a pretty tag and stuck it inside the bag. I think it turned out so pretty!

Thank you so much for stopping by today! 

Wednesday, July 30, 2014

Fun Birthday Card

Hey guys! Today I've got a short post for you. Just wanted to share the card I made for my sister's recent birthday.


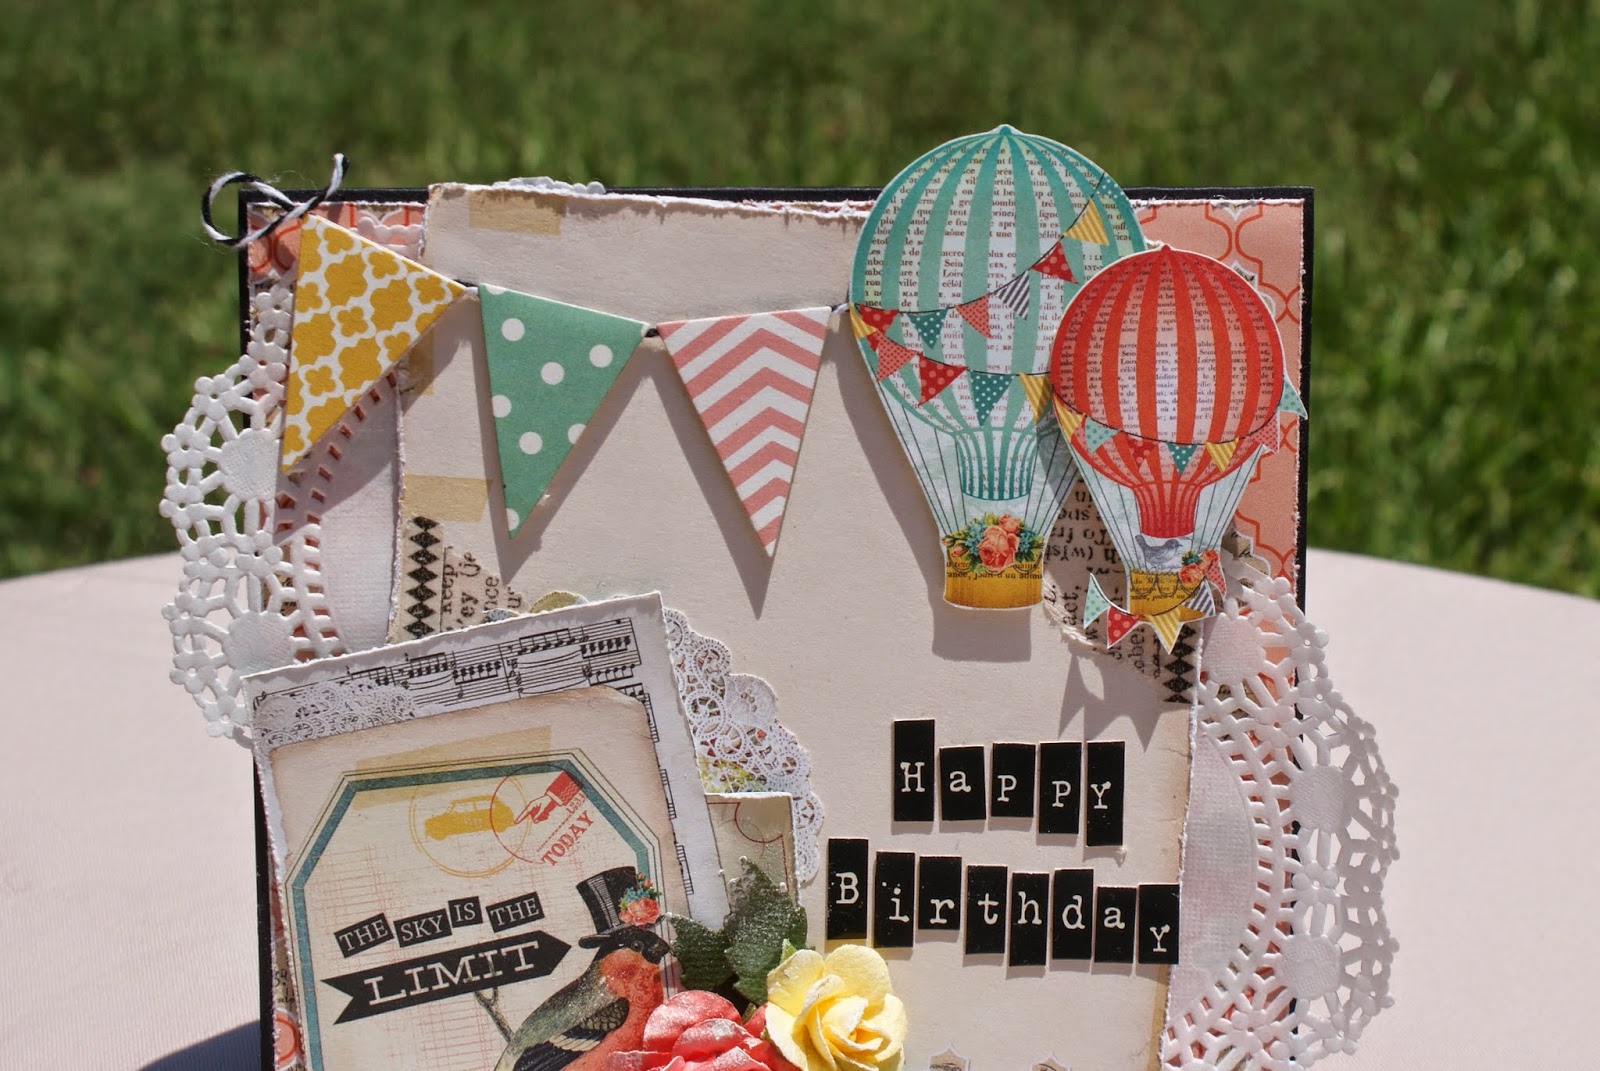
Isn't it cute! I used MME Sky's the Limit 6x6 paper pad and the colors and images were just perfect for the look I was going for. 


I love the hot air balloons and the fun colors. The little pennants were die cut from scraps using Spellbinders Banners die set. All of the paper edges were lightly distressed with Tim Holtz distress tool. I also cut a paper doily in half and tucked the piece in between layers of pattern paper. 


I fussy cut a few images from the paper pad and layered them on the bottom corner over the pieces of tissue tape I used in the background. The flowers were all from my stash and were lightly sponged with warm white acrylic paint. The little leaves were die cut from green card stock and tucked into the cluster. I used alpha stickers for the sentiment and I love how they coordinate with the words beside the little bird image.

This card was a lot of fun to make and my sister loved it! hope you like it too!

Thanks for stopping by. I'll see you all real soon!


Monday, July 28, 2014

12 Tags of 2014, July

Hey everybody! I'm back to share my tag for the month of July. I fell in love with Tim's tag as soon as I saw it and knew I just had to make the time to create my own . Being from Southern California and all, I can't help and be in love with anything beach theme.Since I've moved to Texas,  I think the beach is the one thing I truly miss from Cali...that and the gorgeous weather.


I stayed pretty true to Tim's version and had to purchase the Sand and Sea dies ( any excuse to get new goodies will do) . The background of the tag was created with a combination of Distress paints, stains and inks. The edges are distressed and inked with Frayed Burlap.


I didn't have Shrink Plastic so I just used a piece of plastic packaging and embossed it with the Swirls Texture Fade. It reminds me of waves so it was perfect for the ocean theme. I inked the sea horse with Spiced Marmalade, Rusty Hinge and Barn Door Distress Inks. I also used Rock Candy Crackle and then sprinkled some gold embossing powder on top. I think he turned out awesome!


I followed Tim's recipe to create the "sand" and I've got to say it looks just like the real thing. And it didn't flake off! I'm definitely going to use this technique again. The sand dollar and starfish were painted with distress paints and then sprinkled with gold embossing powder. I also used Distress Stickles on the starfish for added texture.

I had so much fun creating this tag and can't wait to see next month's tag.
Hope you are all making the time to participate in the monthly tags.

Till next time, have a great one!!!

Tuesday, July 8, 2014

Bo Bunny Country Garden Altered Frame and Birthday Card

Hello there! I'm back to share some more projects with you all!
Last week, my sweet, wonderful mom celebrated her 64th birthday. She is a huge fan of anything from " I Love Lucy" and collects the Lucy Barbie dolls, so my husband and I ordered some dolls online. Unfortunately, they would be arriving a few days after her birthday. I didn't want her to not have anything to open on the big day, so I decided to alter a frame for her. She loves to display pictures of her kids and grandchildren all over her room and she just loves when I make her stuff. She loved it! And immediately found a picture to put in it.


I started off with one of those $1 frames from Michael's and painted the sides a warm white. Then I covered the frame with Bo Bunny's Country Garden papers. I distressed the top piece by tearing random pieces and inking the edges with Walnut Stain Distress Ink. I also used my Martha Stewart punch to punch out border strips that I tucked in between papers.


The wooden dressform is from Sacrafter's shop and I left it natural. I just made  a "dress" from one of the pattern papers and added a piece of strung pearls for a necklace. And just look at those flowers! Aren't they gorgeous? The big blue one was gifted to me by Sa and the pink ones are from my stash. They were originally white but I colored them with Heidi Swapp's shine spray in Blush. 


I added Diamond Dust to the tops of all the flowers and tucked pieces of white tulle in my flower cluster, for added girliness! ( Is that even a word?) I also cut apart an Easter pick and used the berries to accent the arrangement. The leaves were die cut with one of the Spellbinder's Foliage dies and pattern paper.


Love these little wooden sentiments from Michael's. They come white and are so shabby chic. Perfect for my frame!


I also made a coordinating card to go with the frame. This was my first time using the Spellbinders Resplendent Rectangles dies, I've had forever.They are sooo pretty! Then I just added a Kaisercraft wood frame and some pearls for accent. The banner was fussy cut from one of the pattern papers and then stamped with "Happy Birthday".


Here's the two pieces together. I think they turned out so pretty and shabby! My mom loved them both and I loved watching her smile when she opened them. Let me know what you think. I really appreciate your sweet comments.

Have a wonderful day!

Sunday, July 6, 2014

Graphic 45 Steampunk Debutante Shrine

Hi everyone! I almost forget to share one of my favorite projects with you all. I made a Steampunk Shrine a few weeks ago, but had been too busy to post and then I simply forget all about it. So today, I saw it in a corner, covered with scraps from other projects and thought I'd share it ( before I forgot again, hehe).


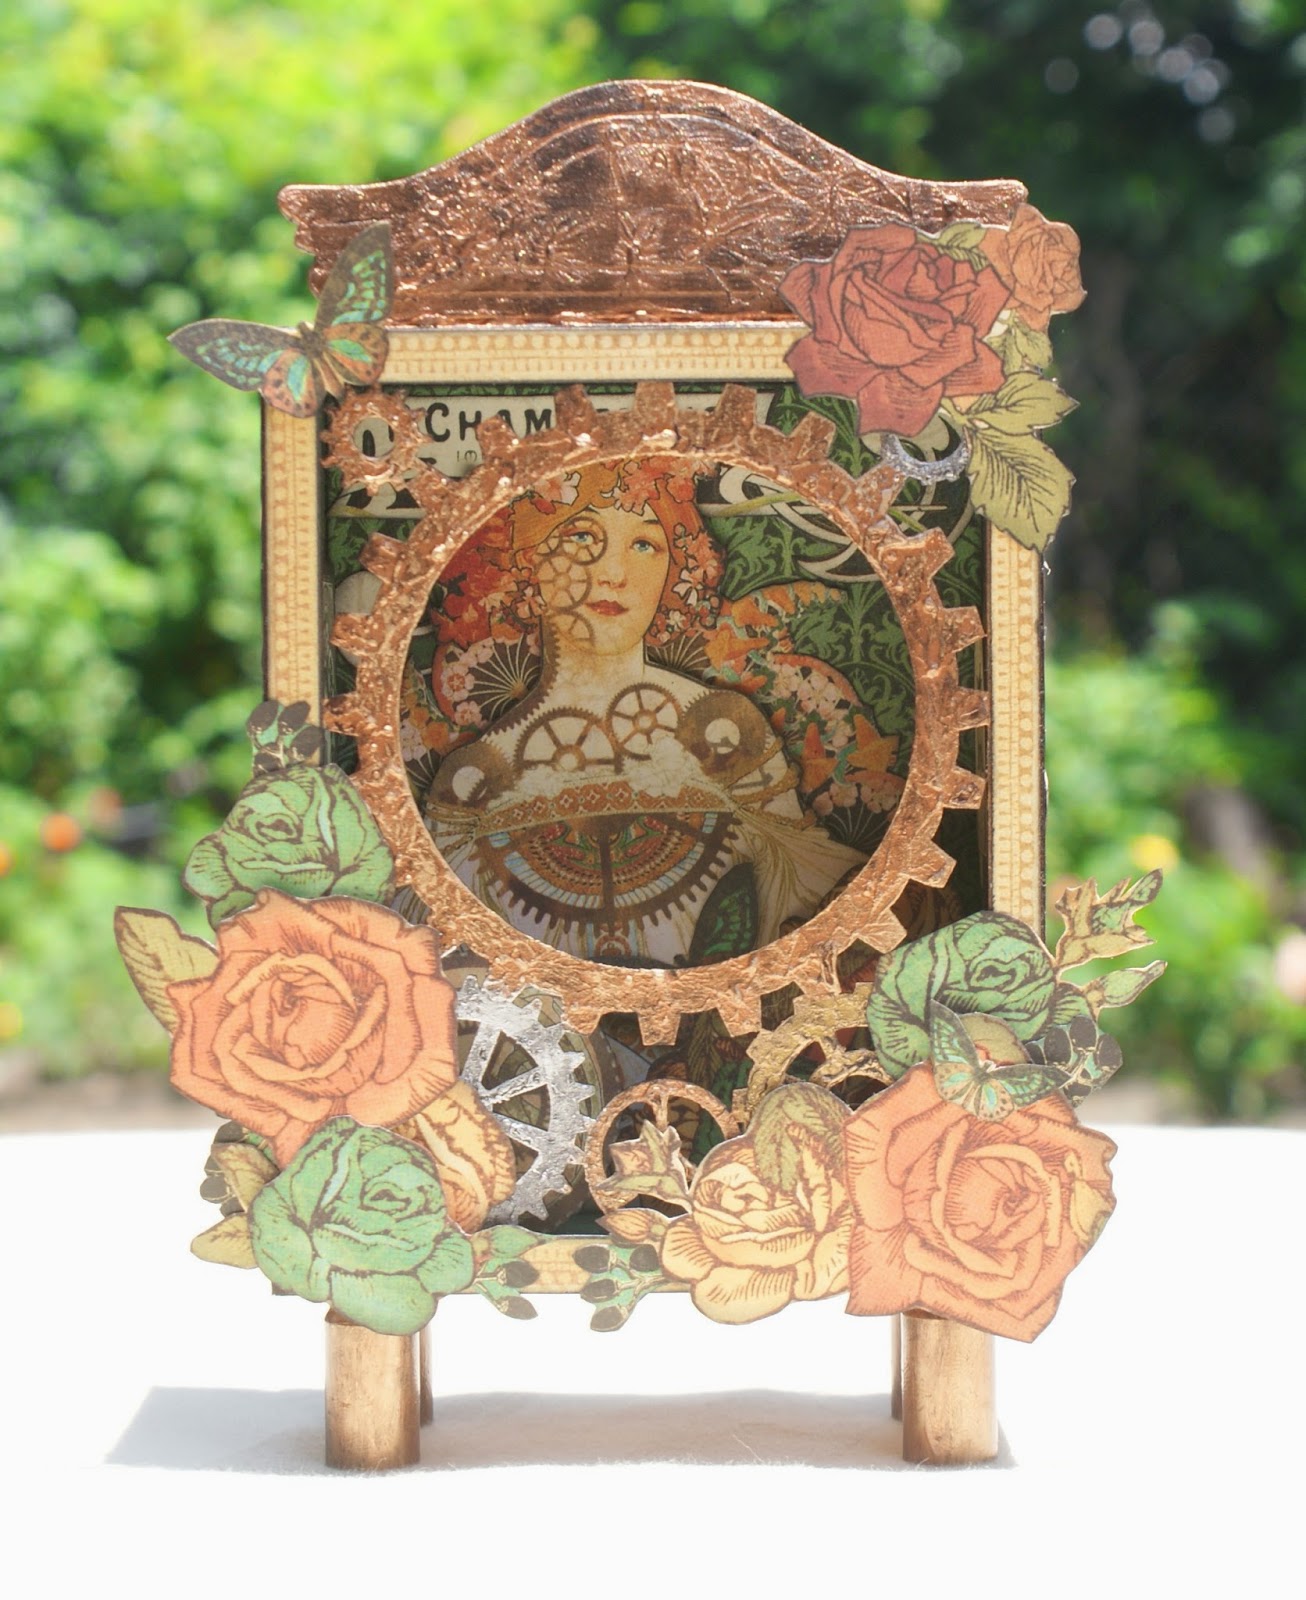
I started off with Sacrafter's Gears Shadowbox and covered it with Graphic 45's Steampunk Debutante papers. The gears were painted with metallic puffy paints and distressed with black gesso. I simply dabbed the gesso on top and then rubbed some off with my fingers. This creates a cool, grungy affect.I did the same technique on the chipboard pediment from Tim Holtz.


Look at the pretty Steampunk lady inside. I fussy cut several images and layered them over one another to decorate the inside of my shrine. 


I love the way the sides turned out. Again, these are all fussy cut pieces just layered together to create this design. It sort of reminds me of Tattoo art, don't you think?


From this angle, you can see some of the fussy cut images inside. It's hard to see all the details but there is a lot of layering going on.


The feet of the shrine are empty bullet casings adhered with E6000. I used my fingers and dabbed some of that coppery puffy paint and then grunged them up with the black gesso. I think the feet look so cool!!!


And here's the back of the shrine. I used one of the Steampunk frames and added mini gears to her hair. I also added glossy accents to the mirror eye to give it a realistic look. Then I just added a fussy cut butterfly to the flowers on the bottom left hand corner, and that's it.

Being a lover of all things Steampunk, it's only natural I fall in love with this piece. Almost everything I make ends up in someone else's home. But this puppy is all mine and I can't wait to add it to my display case! Hope you all like it as well and thanks so much for stopping by!

I'll see you all real soon...