Thursday, May 22, 2014

12 Tags of 2014, May

Hi everybody, welcome back! Today I want to share with you my take on Tim's May tag. I'm so proud of myself because I finished it with plenty of time to spare. I just knew I had to do it now because I'm going to be crazy busy in the next 2 weeks and wouldn't have the time then. It was a very simple tag this month, I think the hardest part was using all the little trinkets I've been collecting.But why collect them if you're never going to use them, right?  So here's my take on the tag:

Imagine, Create, Inspire tag
 
I kept it pretty simple and followed Tim's lead. I created the background with a combination of Peeled Paint, Wild Honey and Pumice Stone Distress Inks. Then I  splattered some water on the tag to create a mottled look. The tiles were cut out of chipboard and I covered them with bits from the Wallflower paper stash. Before adhering the tiles, I adhered my tag to a piece of burlap paper, a tad bit bigger than the tag. The burlap frames the tag nicely and I really like the way it looks.
 
 
The inspiration for the tag came from a wall hanging I had seen at a store. It just read Imagine, Create, Inspire. I thought that really summed up what we do as crafters, so it would be perfect for the tag. The butterfly tile is just like Tim's, since I really liked the look of the butterfly over the sticker frame. I just  added a chit chat sticker that reads inspire, to complete my title. The little light bulb is for the sparks of creativity and the #5 game piece is just for the month of May. This way I remember what month this tag was for.


The key and keyhole are to symbolize unlocking our talents and opening up our minds to the possibilities. I love those cute little gears, too.They symbolize the gears turning in our heads, working full speed, helping us to come up with new ideas. I used a Philosophy Tag that reads "Imagine" and then used several different Alpha Parts to spell out " Create". The letters were too shiny, so I scuffed them with my sanding block.
 
Well, I hope you like my tag. You still have plenty of time to play along if you haven't already.
 
Thanks so much for stopping by! I'll see you all real soon.

Monday, May 12, 2014

Altered Jar, card in a box, and handmade gift box for Mother's Day

Hi everyone! I hope you all had a wonderful Mother's Day, yesterday. Mine was pretty uneventful ( not that there's anything wrong with that). We're just not big on going out for Mother's Day. I mean, all the restaurants are booked solid, you've got to deal with all the crowds, and really it's just another day in my book. Now, that doesn't mean we don't do gifts. No sir, I better get something good for all the hard work I do all year, lol! And hubby, never disappoints. This year instead of buying me a bouquet of flowers that will only die in a few days, he went out and bought me a garden! Really! He came home from Lowes with tons of beautiful blooms, rose bushes, Casa Blanca Lilies  and spent the entire afternoon planting them all in the yard. Now I can enjoy beautiful flowers all year long! Love that man of mine, hehe.
As for me, I spent the day finishing off the projects  I made for my mom. I am so very fortunate to still have her in my life and she means the world to me. So every year, I try to make something special for her, to show her how much I care. One of the first things I ever made her was a macaroni "portrait" when I was 5 years old. The smile was all lopsided and it definitely didn't look like her, but would you believe she still has it? Well, my crafting abilities have definitely improved since then, so let me share what I made.

Altered Mason Jar

 
My mom really loves to sew but she is always losing her sewing notions. So I came up with a  solution to that problem. I decided to alter a good ol' fashioned mason jar. The lid became a pincushion for her pins and needles and she can open the jar and use it to store her thimbles, tape measure etc... Plus it makes for a cute décor piece, don't you think?


Sewing Theme Card-in-a-box
 
I've been seeing so many of these pop up cards on Pinterest and I just had to give it a try. They look complicated but they are really so easy to make. Of course, I continued with the sewing theme and I used several of my Tim Holtz dies to decorate my card. I used the Ornate Frame die and turned it into a mirror using the adhesive mirrored sheets. I also used the Sewing Room die and part of the Sewing Edge die to create some embellishments. The paper collection I used is by DCWV call the Primrose Stack. It's gorgeous!!


Handmade Gift Box
 
Well, you can't give such a pretty card in just a plain old envelope, right? So I created a cute little gift box for my card.
 
 
See how nicely the card fits in the box and it makes for such a beautiful presentation.
 
 
 Here's a picture of the whole gift set.
 
I'm so happy with the way my projects turned out and my mother loved them! The smile on her face was as big as the one many, many years ago , when I handed her the macaroni portrait. That smile always bring me great joy! Love you to pieces Momma!
 
Hope you all enjoyed my projects and please come back to visit . I'll see you all real soon.


Thursday, May 8, 2014

"Something Blue" Altered Printers Tray

Hello friends! Today I want to share with you a project I created to celebrate my recent wedding anniversary. My anniversary was on April 23 and I celebrated 8 wonderful years of wedded bliss with the love of my life. It really seems like we've been married so much longer though, because Jay has been in my life for over 14 years. What started out as friendship simply blossomed into love over time and I couldn't be happier. So to commemorate 8 wonderful years, here's my latest creation:


I used Prima's "Something Blue" collection and lots of wood and metal pieces I had on hand. I really love the soft colors of this collection and I printed out my pictures in Sepia tone to better suit the color palette.
The Printers tray was intended as  a gift for my hubby, but as you can see, it turned out more feminine than I had planned. " So who is it for really?" he asked. I had to laugh at that, guess I got carried away with all the flowers, hehe. But it did turn out so pretty and it's going to look wonderful hanging on my wall.


Phew! Lots of pictures,  I know. Just wanted to show you close ups and details of all that went into each compartment. Altering printers trays is a lot of work and this one was definitely a labor of love. I hope you like it as much as I enjoyed making it and I thank you so very much for stopping by. Have a great day !


Sunday, May 4, 2014

DiscountPaperCrafts May Card Kit- Masculine cards

Happy Sunday everyone! I'm back to share some cards Kaylah and I created using the May Card Kit from DiscountPaperCrafts. This month's card kit features Echo Park's Reflections paper pad and comes with everything you need to create some fabulous handmade cards. I really love that this kit has a masculine feel to it. Masculine cards can be a bit of a challenge for most of us, but this kit is a great starting point and the colors are just perfect for masculine projects. So let me show you what Kaylah and I came up with:

 
 This is the first card we created with the kit. It's a very simple card to recreate and I just love how the pattern papers look layered over one another. Of course, we had to bust out the Old Jalopy die by Tim Holtz, for this one. We cut it out of chipboard that came in our kit and gave it 2 coats of dark blue paint. We also used a sponge dauber to apply some gunmetal paint in random spots. Then we sanded the die cut to reveal some of the chipboard and inked it with Vintage Photo. This gave it a really rusty , vintage look. We added some Finnabair metal pieces ,that were painted with the same gunmetal paint ,for the "hubcaps". I like how they don't match...it's an old jalopy after all.
 
 
Love the layering on this card. We lightly distressed all the edges of the paper and added a piece of corrugated board for texture. The postcards and stamps were fussy cut from one of the papers and inked with Vintage Photo before adhering them to the card. The main image and sentiment are from the "Life's Possibilities" stamp set, also by Tim Holtz. Lastly, we added a mini paper clip and one of the smaller Adornments arrows.
 
 
I think this one might be my favorite. I was inspired by Tim's January tag, so I incorporated the pocket watch and techniques to create this card. The pocket watch was painted with dark brown paint then dabbed with coppery puffy paint. We used our fingers and made sure not to cover the entire surface. I really like metallic color and the texture the puffy paint creates, when heated. I covered the Alpha Parts with embossing ink and covered with Distressed Powders in Walnut Stain. Then I just randomly dabbed some coppery paint on top of the letters. Pretty cool huh?
 
 
I went for a nautical theme on this one using a stamp set I recently picked up at Michaels. I stamped the image using Memento Ink in Tuxedo Black then colored it with distress inks and a waterbrush. The "waves" were created with Tim's On the Edge Scrollwork die. I die cut 2 strips out of the pattern paper and I layered them using foam tape. For texture, I added a piece of burlap trim and some cheesecloth behind the main image. And of course, I had to add something metal to my card, so I layered a Compass coin over one of the Finnabair metal pieces from the kit. A cute little tag tucked into some jute string completes the look of my card.
 
 
Even though the kit has a masculine vibe, you can still create a more feminine card with the addition of  some girly touches. Here I used some of the floral papers from the paper pad that were in the lighter colors. I added a piece of lace trim on top of the burlap trim from the kit to soften it up a bit. The birdcage is a wood die cut that I inked with Wild Honey Distress Stain and dabbed with a little Snow-Tex for texture. I created the flower cluster using the Petaloo Textured Petals that came in the kit. They're made out of burlap and come in a beautiful shade of green that coordinates so well with the papers. A few die cut leaves and a metal piece cut in halves complete my cluster. I really love the rustic charm of this card!
 
So you see, masculine cards don't have to be a challenge. Cathie, has already done the hard work for you and has put together the perfect kit for your masculine creations. Head on over to DiscountPaperCrafts and get your hands on this great kit before it sells out. And for only $20, it's a great deal!
 
 Thank you so much for stopping by today! I really do appreciate it and I hope you have a wonderful Sunday. See you all real soon.


Wednesday, April 30, 2014

Chocolate Ribbon Cupcake & Cupcake Birthday Card

Hey Guys! Got a couple more projects to share with you today. I actually made these a few weeks back but haven't had a chance to post on my blog. Still playing catch up, as you can see.
A dear friend of mine celebrated her birthday recently by hosting a super fun challenge on Youtube. She asked everyone to make her a cupcake or anything depicting sweets. I guess we know what she's craving. She is 8 months pregnant after all, lol. I had never made a cupcake before ( well not one made out of paper) so I jumped at the challenge. And believe me it was! I don't understand how something as easy as making a cupcake liner could be so hard. But it was for me! I was having such a hard time getting the liner to adhere to my cup base. Too much of a perfectionist I guess. So after 3 botched tries, here's what I came up with.

 
Chocolate Ribbon Cupcake
 
I used a paper cup as my base for the cupcake. I cut it to stand 2 inches tall and adhered the scored liner to it with hot glue. The cupcake liner is 2 strips of paper, scored at 1/4 and glued end to end. I added a bit of lace and some pearls at the bottoms because I didn't want it to look to plain and I placed my cupcake on top of a die cut doily. I just love the way the brown satin ribbon looks like real chocolate. Almost good enough to eat huh? A few pearl " sprinkles" and a "cherry" on top finish off my sweet cupcake.


Cupcake Birthday Card
 
Inspired by my chocolate cupcake, I decided to create a coordinating card. I used the leftover scored strip from my cupcake and punched one edge with my MS punch. The top of the cupcake was created with a bunch of little punched out flowers using brown cardstock. I then added small pearls as sprinkles and topped it off with a pink flower sprinkled with diamond dust. I love the cute sentiment too! It's a Stampendous stamp I picked up at Michael's. It was just perfect for my card.


 Here's another view of the card. You can see I finished the inside as well. I kept it pretty simple so I can have lots of room for my message.
 
 
And here are my 2 cupcake projects side by side. I think they turned out real " sweet" and I hope you like them as well. My friend got a kick out of them and that always puts a smile on my face.
 
Until next time, my friends. Take care and I'll see you all real soon!


Sunday, April 27, 2014

Kaisercraft Altered Dressform & Shabby Chic Card

Hello there friends! I'm back to share some new projects I created for a dear friend. She recently celebrated her birthday and is also in the process of redecorating her craft space. So I thought it would be perfect to create a décor piece that will fit right in with her new décor.


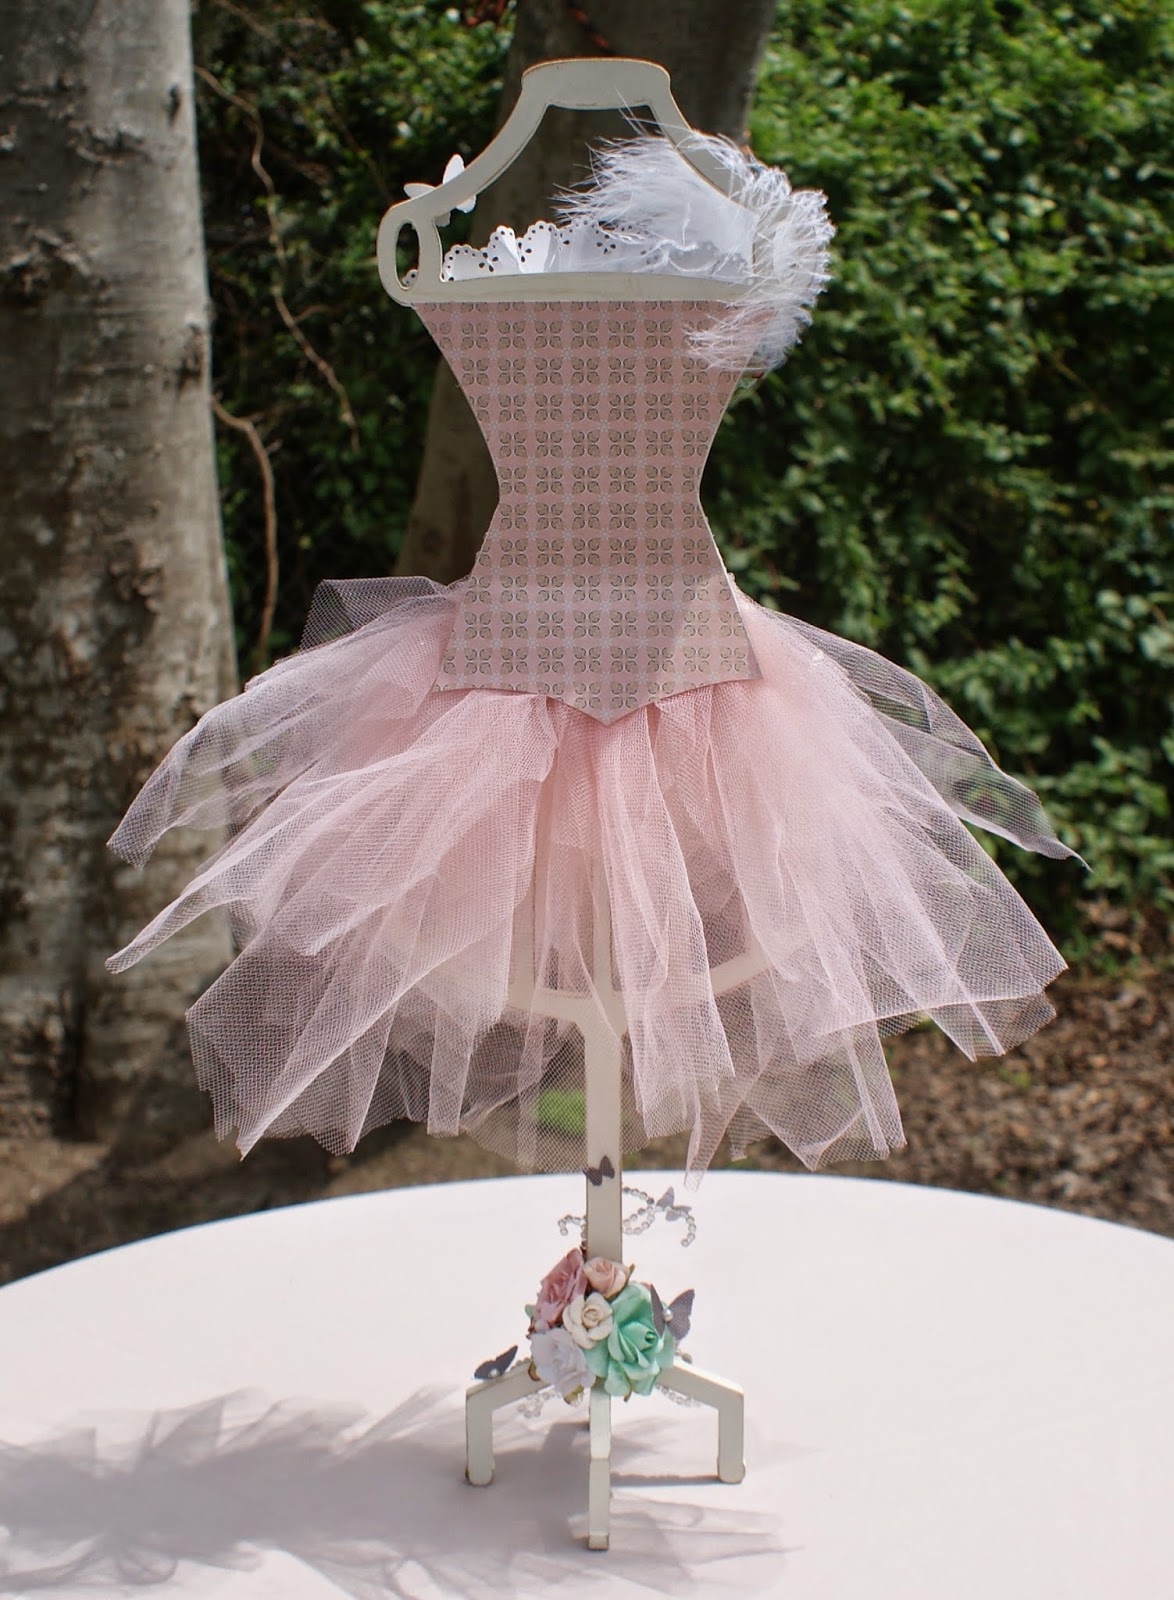
Ta-da! My Shabby Chic dressform!
 
I've had the Kaisercraft dressform for a while now and it was just begging to be altered. I gave it two coats of warm white paint and I sanded all the edges to give it a worn look. I used the "On this Day" paper collection, also by Kaisercraft, to create the pretty little corset.
 
 
I created the skirt out of pieces of gathered tulle. I only had white tulle so I colored it using Heidi Swapp's Color Shine spray in Blush. It is the perfect shade of pink and complimented the papers so well.
 
 
Here's a close up of the corset. Omg, those eyelets were a pain in the butt to set but I'm so glad I took the time to do it. They're the perfect touch!  I had to color that ribbon as well since I didn't have it in the right color. I just used a combination of Lindy's Stam Gang Sprays to get the right color. And just look at all those little rhinestones! Now that took some patience,lol. They are so tiny and I had to use a dab of glossy accents to adhere them on. It's all in the details!
 
 
I even finished the back.
 
 
 I kept the base pretty simple. Just added some dyed flowers, some pieces of bling flourish and cute little punched out butterflies. Pretty cute huh?
 
 
Now, you can't give a gift without a pretty card right? And as always, I like to coordinate my card to the project I've created. The card measure 5 1/2 x 51/2 and has several layers. The wooden piece in the center is from Michael's and I left it bare, since I really like the look of the wood. The colored flowers were dyed using color sprays I had on hand.
 
 
 Here's just another look at the card. You can see I finished the inside as well.
 
 
Here are the two projects together. I just love how they coordinate.
 
Well, that's all for today. I really hope you liked my projects. I had so much fun creating these for my friend. She smiled so big when she opened her package and that in itself is the greatest gift. Hope you all have a wonderful week and I'll see you all real soon!


Saturday, April 19, 2014

12 Tags of 2014, April

Hey everybody! I feel like it's been a while since my last post. I've been doing a lot of crafting and I do have some new projects to share with you, but just haven't found the time to sit down and post. Work and family keep me pretty busy if you know what I mean. So here I am, trying to catch up...
I did manage to find the time to create my April tag with time to spare before the deadline. Tim did a beautiful job with this new tag. It's a little softer than the usual but oh, so pretty! And perfect for Spring.

My take on the April Tag


 I usually work with what I have on hand since I don't always have all the supplies Tim uses. But, I couldn't help myself and I ordered the new Frameworks Trellis die. It's what makes the tag special. How could I not have it, hehe. I'm so glad I did ,so many possibilities with this die.
 
 
I followed all of Tim's steps but used different color inks and paint for my background and on the trellis die cut. If you look closely at the die cut inserts, you can see where I used Tim's Seasonal Paper. I just had to incorporate those cute Easter bunnies into my tag.
 
 
This was my first time using my Tattered Pinecone die, can you believe it. I've had it forever and haven't touched it! That's what I like about making these tags every month. It gives me an opportunity to use some of the older things I have in my stash. I really like how my roses turned out but I felt the little cluster needed something more, you know. So added bits from an Easter pick and just tucked them here and there among the flowers. Perfect for Easter!
 
I had so much fun creating this tag and can't wait to play again next month. If you haven't participated, you should really consider joining in. You won't be disappointed.
 
I hope you all have a wonderful Easter and I'll see y'all real soon!