Saturday, February 28, 2015

Botanical Tea Storage Unit

Welcome back! Today I want to share another Guest Design Team project for Sacrafters. She was kind enough to send me  her 4-drawer storage unit and I thought it would be great to alter it for my craft area. I'm always in need of more storage, and this was the perfect piece to alter with the Graphic 45 Botanical Tea collection. I've been hoarding this paper pad ever since I got it,lol.


I love the way the storage unit turned out and the papers are just gorgeous! With all the roses and birds, it just makes me long for Spring. The Wood Flourishes and metal pulls by Kaisercraft add just enough detail to the drawer fronts.


I found a metal candle holder at my second hand store and I created a little nest inside. The candle holder resembles a little tea cup so it went perfectly with the theme of the papers.I fussy cut some elements from the paper pad, added some flowers and branches to create a botanical scene on top of the unit.


For the sides, I simply added doily die cuts from the Cheery Lynn French Pastry die and layered fussy cut elements. The metal corner pieces are by Momenta and are the perfect antique gold.

 Here's the back of the unit. Simple but pretty!

Hope you like today's project and thank you so much for stopping by.
Head on over to Sacrafters and don't forget to use discount code "lizfans" to get 10% off your purchase of $30.

Have a wonderful day!

Thursday, February 26, 2015

Spring Garden Card-in-a-box

Hello there crafty friends! Today was the first time I've seen the sun in what seems like forever. It's been so dark and gloomy, here in Spring, Texas.. Now I know I shouldn't complain when some of you are dealing with 6 feet of snow and blizzards, but I'm just so ready for warmer weather. Aren't you? So in my attempts to get myself ready for  spring , I  created a garden themed card-in-a box. This is only the second time I've made one of these cards and I have to say they are so much fun. Not to mention adorable!


 The card is a Design Team project for Not2Shabby. I used an older paper collection by DCWV called The Preppy Princess Stack. I just love the soft colors and the images, perfect for fussy cutting.


The sweet image stamp is by C.C. Designs, called Rose. I've used her before on another card and I think she is just precious. I stamped the image onto watercolor paper and then colored her skin and hair with watercolors. I paper pieced her outfit using scraps from the paper pad.


I used 4 strips inside my card to get a fuller look for the garden. I love how it looks like she's standing in the middle of all the flowers. I die cut the  little fence from a Magnolia Doohickey die and the cute little clouds are felt stickers from my stash.


The sentiment was fussy cut from the paper pad as well as all the flowers on the side panels. I added cute little pearls to the flower centers.


This is the back of the card where I can write my message to the recipient. Some simple fussy cut elements adorn the corners.

 I think it turned out so cute and I really cannot wait for my roses to bloom come Spring.I really miss seeing all the beautiful colors in my garden.

Hope you like my card! Head on over to Not2Shabby to get the best deals on all your favorite image stamps. Use discount code "LIZRUSSELL" for 10% off your purchase.

Thank you so much for stopping by. Hope you all have a great day!

Tuesday, February 17, 2015

Tags of 2015, February

Hi guys! Today, I'm going to share my take on Tim Holtz's February tag. I just loved Tim's version so I stuck very closely to his original design.

February Tag


First, I created the background using bits of the Wallflower paper pad since I didn't have the ephemera pack. I sealed it and added the shadow effect with the Black Soot Distress marker and splattered a little bit of black paint on top. I wanted to soften up the edges of the tag so dabbed Picket Fence Distress Paint on all the edges, after sanding them lightly with the sanding block.


I don't own the Movers and Shapers heart die so I had to create my own out of chipboard. I cut 3  hearts by hand and glued them together for dimension. Then I painted the heart red and used glossy accents to cover it with Festive Berries Distress Glitter. I just really felt like having some sparkle on my tag!The tiny key hangs from the heart with a piece of embroidery floss and since I didn't have a word band I used Chit Chat and Label stickers to create my sentiment.


I really liked the way Tim attached the heart charm to the arrow so I did it the same way.Then added bits of lace and a mini corner on the bottom left corner of the tag. I topped off my tag with a seam binding bow and Voila!

Loving the way it turned out and I cannot wait to see what Tim has in store for us for March! 
Thanks for stopping by and have a wonderful day!

Sunday, February 15, 2015

Baby Girl Shadowbox Birth Announcement

Hi guys! I hope you all had a wonderful Valentines day and are enjoying this beautiful Sunday. Today I'm sharing a new project I created as guest designer for SaCrafters. SaCrafters carries unique shadowboxes, storage boxes and other items made out of wood, mdf and chipboard. For today's project I used the Baby Girl Dress Layered Shadowbox and turned it into a cute birth announcement.


I love it! I think it turned out so precious! 
The picture is of my youngest daughter at only 6 days old. She's 9 years old now and this sweet picture just brought me so many sweet memories.


I used Kaisercraft's "Bundle of Joy" paper pad and fussy cut some elements to add to the shadowbox. I covered a few bare wood blocks with scraps of paper, added cute miniatures and a small piece of rosette trim to create a nursery scene.


Here you can see the distressing I did on the shadowbox. I first painted the entire thing with warm white acrylic paint, dabbed some petroleum jelly in some areas, then painted it with a coat of baby pink acrylic paint. I used fine grain sandpaper to remove some of the topcoat of paint and further distressed it with Vintage Photo Distress Ink.


I covered the back of the shadowbox with the pattern paper and added the stats of my baby's birth.The cute little feet are stickers I've had in my stash for years.


I added a piece of ribbon to the back so it can easily hang and be displayed in the home, as a beautiful keepsake.Lastly, I added pearls ( one at a time) to the rim of the shadowbox.

I think this project would make for such a wonderful gift and is such a sweet way to announce the birth of a new baby.I really do love the way it turned out.

I hope you all enjoyed my project share for today.
If you would like to get your hands on really unique shadowboxes, head on over to SaCrafters and don't forget to use discount code "lizfans" for 10% off your purchase of $30 or more. 
Thanks for stopping by and have a wonderful day!


Thursday, February 12, 2015

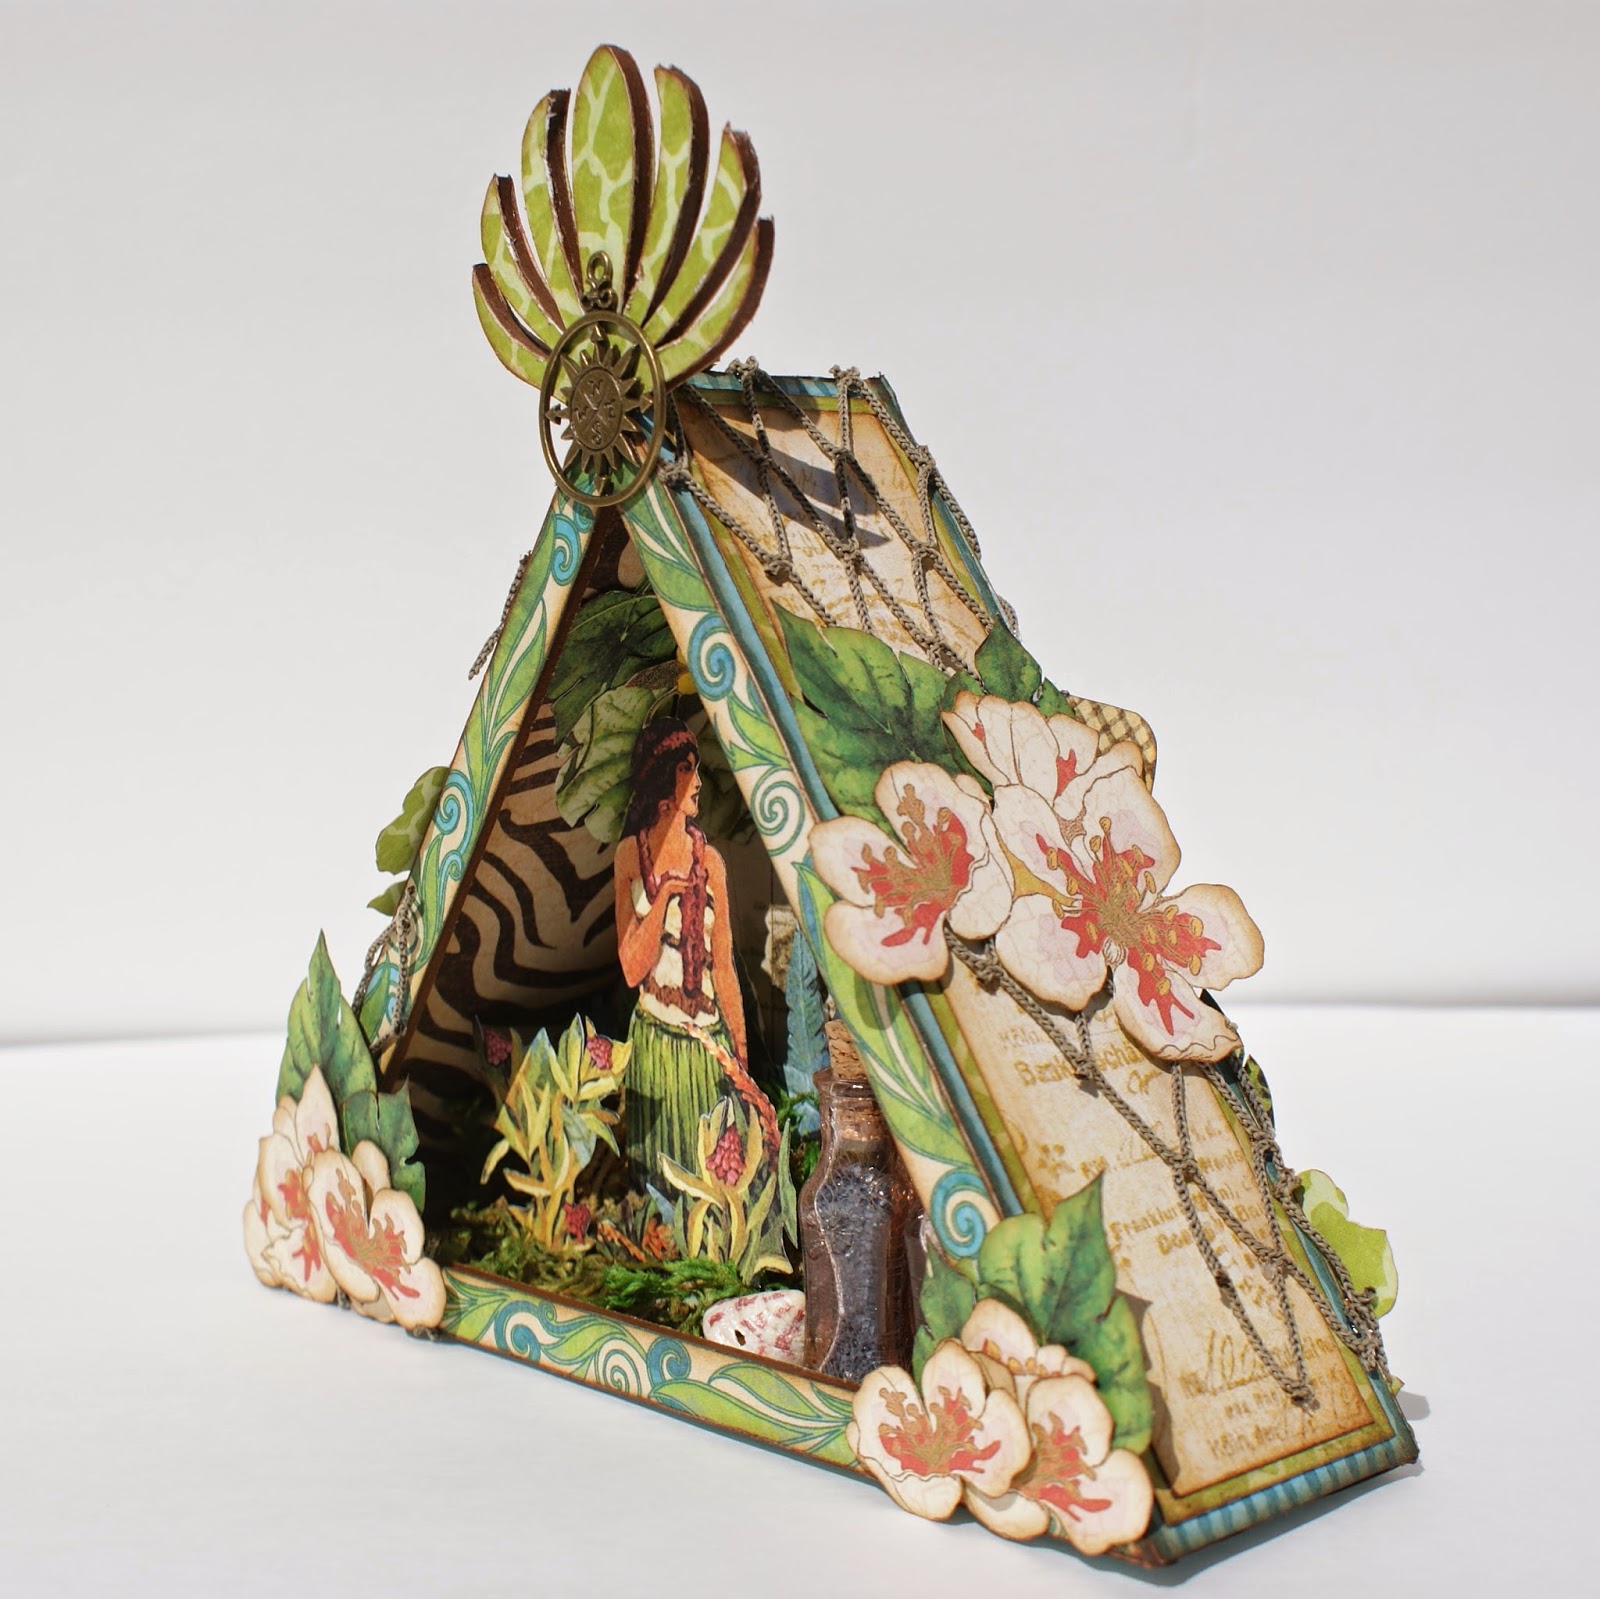
Tropical Shadowbox for SaCrafters

Good morning friends! I've been asked by the ever talented Sa, owner of SaCrafters, to be a guest DT member for the month of February. Sa designs creative and functional alterables out of wood, mdf, and chipboard. She sent me some great pieces to work with and today I'm going to share the first of four projects.


This is the Triangle Shadowbox available in her shop. As soon as I saw it, it made me think of the "Tropical Travelogue" collection by Graphic 45. I just knew it would be perfect for this project.


Inside, I created a tropical 3 dimensional scene. I did a lot of fussy cutting and layered all my pieces with foam and bits of moss.


The small glass bottles were brushed with Clear Rock Candy Crackle Paint and stained with Vintage Photo Distress Stain to give them a weathered look. I then filled them with different colored sand and added sea shells around them.

.


For the sides, I added bits of decorative netting and fussy cut flowers and leaves from the paper collection.


This is the back of the shadowbox. I simply layered some fussy cut elements to create a sort of collage.

I just love the way the shadowbox turned out and I think it would be a great way to display mementos from your tropical getaways.

Head on over to SaCrafters shop and check out an amazing selection of wood, and chipboard products, as well as stencils. You can use discount code "lizfans" for 10% off your purchase of $30 or more. The discount code is good for the entire moth of February.

Thank you so much for stopping by! Hope you all have a wonderful day!

Wednesday, February 11, 2015

Free Standing Pop Up Card for Not2Shabby!

Hello there, crafty friends! Today I want to share with you another Design Team project for Not2Shabby. I made a free standing pop up card for my mom, for Valentine's Day.


Isn't it cute? I found the tutorial for the card on Splitcoaststampers but I modified the dimensions to fit the sweet image. 


The image stamp is another cutie by C.C. Designs, called Rose. I colored her with my Copic markers and added Stickles to the heart on her headband and dress.
The oval die cuts are by Spellbinders and I rimmed the outside oval with small rhinestones.


You can see here how it stands up on it's own.


Here, you can see how it folds up for easy mailing.

 This card was very easy to put together and I really love the way it turned out. I hope you like it too!

Head on over to Not2Shabby  for the best deals on stamps and other crafty goodies. Dont' forget to use discount code "LIZRUSSELL" for 10% off your purchase.

Thank you so much for stopping by and I hope to see you all real soon!

Sunday, February 8, 2015

Valentine's Day Mini Wreath for Not2Shabby

Hi guys! Today I want to share a really cute and simple mini wreath I made for Valentine's Day. It's my first Design Team project for Not2Shabby shop.


I found the mini wreath at the dollar store and wrapped a wire heart garland all around the wreath. 


The sweet image stamp is C.C. Designs Swiss Pixie Cupid. I colored her with Copic markers and added Stickles to her wings, the sole of her shoe and the little hearts. I love the added sparkle from the Stickles.


The banner is actually sticker pennants backed by cardstock and hung with bakers twine. I added cute glittered clothespins at both ends of the banner.


I found the red, felt roses at my local crafts store and I made the white ones myself. Then I added glittered berries from and old Christmas pick for more sparkle.

I think my mini wreath turned out super cute! I especially love the sweet little girl and all the sparkle.

Go check out Not2Shabby shop and use coupon code LIZRUSSELL for 10% off your purchase.

Thank you so much for stopping by!